Managing the Favorites Palette
Originally published in ArchiMag, October 2011
Printable PDF from original magazine version
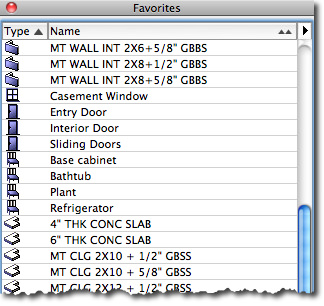 The Favorites Palette is a great time-saver in ArchiCAD. It provides a convenient way to save the settings of elements that you use frequently. It works nicely for both 3D components and 2D annotation, and for generic elements (walls, slabs, etc.) as well as library parts (doors, windows, objects, etc.).
In this article, I’ll briefly give an introduction to the Favorites palette, and then focus on some of the challenges of maintaining Favorites over time (as new versions of ArchiCAD are released) and sharing and transporting Favorites between different projects.
The Favorites palette is accessed from the Window menu > Palettes > Favorites command, and may also have an associated Toolbar icon and/or a keyboard shortcut set up.
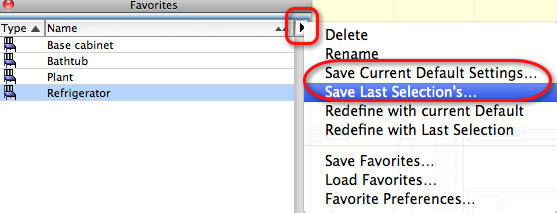
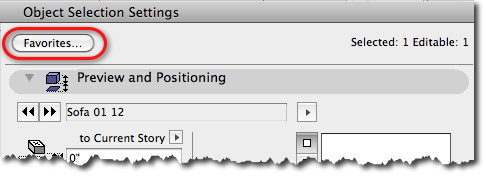
Elements may be added to your current Favorites using the popup menu in the upper right of the palette (either Save Last Selection’s… or Save Current Default Settings…) or from the Favorites section near the top of most of the Tool Settings dialogs (e.g. Wall Settings, Object Settings, etc.).
For details on basic usage of Favorites, please consult the ArchiCAD Help or Reference Guide. You may find it useful to refer to my Video Tutorial on Favorites on my Youtube channel:
www.youtube.com/watch?v=QtCv_4m3BHY
For additional ideas and variations on this topic, check out my Tips and Tricks article on Favorites and Interactive Legends:
http://www.bobrow.com/archicad-tutorials/archicad-tutorial-archicad-favorites-and-visual-legends/
THE FAVORITES LIFECYCLE
Favorites are retained in a project file, so they continue to be available when the PLN file is saved and later reopened.
It is possible to save a copy of the current Favorites using the popup menu in the upper right of the palette and choosing the Save Favorites… command. This will create a PRF file (one can think of this extension as short for “element preferences”) that can be saved anywhere on your computer, and possibly copied to any other workstation.
This PRF file can be read into another project, or your office template (TPL) file, using the converse command Load Favorites… After selecting the PRF file, one is given the choice to Replace or Merge.

If one replaces the Favorites, then the new list will be exactly as it was when the Favorites were originally saved. With the merge option, the list will contain all items from the active PLN as well as the PRF file.
If the PLN file uses the same ArchiCAD Library and similar Layers and other Attributes, the imported Favorites will work exactly as before.
However, if the PLN uses a different library, it is likely that some of the Favorites will show up in grey rather than black, and be inactive and inaccessible. In addition, any Favorites that reference Layers or other Attributes that do not exist in the current PLN will not be fully functional.
MIGRATING FAVORITES TO A NEW VERSION OF ARCHICAD
Items shown in grey in the Favorites palette are inactive because they are not available in the currently loaded Library. This is typical when migrating a project, or a Favorites PRF file, into a later version of ArchiCAD that has a new library.
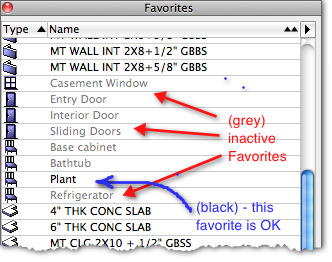
Not all library parts in the old list will become inactive, because some will automatically find their matching component in the new library. Typically, this is because these parts were not actually changed in the new ArchiCAD Library version; they may have a new name (e.g. Plant 03 14 rather than Plant 03 12) but are identical elements and marked internally by Graphisoft as such.
The grey inactive items refer to parts that do not exist in the current library. If these are standard Graphisoft parts, then revised versions are likely to be available; this section of the article will explain an efficient method for substitution.
TIP: If any of these inactive items are custom parts that you created, downloaded or purchased, or included in third-party libraries, then you will need to load those parts either as individual components (perhaps adding them to the embedded library for the PLN or TPL file) or by loading a folder that contains them. After reloading libraries, these list items will show in black and be active and available.
To update and/or rework the inactive items in your Favorites list, the first thing you’ll need to do is to load the libraries necessary to access them using the File menu > Libraries and Objects > Library Manager. You may load the entire old library (e.g. ArchiCAD Library 12) for this purpose, although it is generally preferable to load Migration Libraries and/or Subset Libraries that are set up to avoid duplication of items in the current library.
It is beyond the scope of the current article to discuss library management strategy in detail. In actual fact, either method (loading entire library folders or migration subset libraries) will work well for this process. After completion of the Favorites migration, one can (and should in most cases) reduce the Graphisoft libraries being loaded to just the single standard library for the current version.
After loading the old library or libraries (in addition to the current one), all items in the Favorites list should now appear black and available for use. To migrate a Favorite that was previously grey, and therefore linked to an old library part, double click to activate that Favorite and place an example of this element into the floor plan, either as a free-standing object or a window or door in any wall.
Select the newly placed element, and open up its Settings dialog. Here, you will want to switch the part to refer to an item in the current library. Make sure that all parameters are set properly to give the desired result, including size, materials, and other options. (I’ll give a convenient shortcut below to simplify this part of the process.) After completing the swap, click OK, and the component will be seen and remain selected on plan.
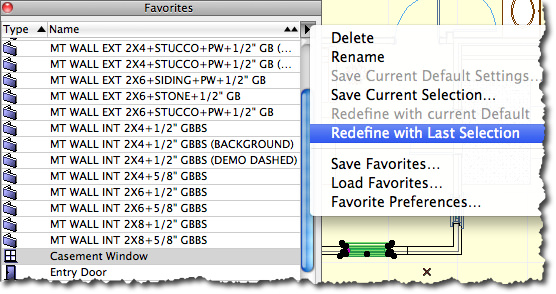
To update the Favorite in the palette, carefully click ONCE on that Favorite list item to select it (don’t double-click, as this will inject the Favorite settings into the selected element on plan), then use the popup menu and choose Redefine with Last Selection. This will record the change, and from that point forward, the Favorite will use the current library rather than the old library.
SPEED TIPS TO SIMPLIFY SETTING UP THE NEW FAVORITE
To make this process of setting the new part to match the old one as efficient as possible, take advantage of two powerful shortcuts in the Settings dialog that are often missed: Find library parts by keyword, and Parameter Transfer from one part to another.
Here is how to use the first shortcut to find corresponding parts in the new library more quickly. Place an instance of one of the items from the Favorites palette. Select it, and open up the settings dialog. Let’s say it’s a base cabinet. In the object settings dialog, you can search for library parts matching a particular keyword or part of their name.
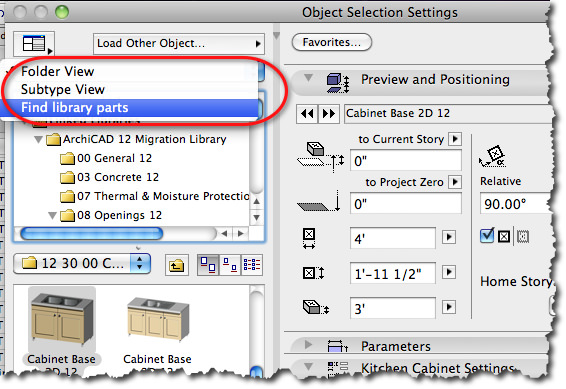
In ArchiCAD 14 and earlier, use the popup menu in the upper left of the dialog box to Find library parts rather than Folder View, which is the default.
In ArchiCAD 15 and later, the search option is accessed by clicking the magnifying glass icon in the upper left or by clicking in the text input area.
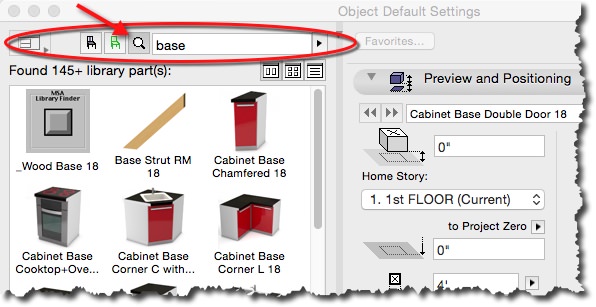
Search for the corresponding part – for example, type in “base” or “cabinet” and click Find or hit Enter or Return on your keyboard.
You’ll instantly see a small number of parts listed that meet the keyword filter, and can quickly locate the new, corresponding library part without having to navigate through the folder hierarchy. This is much faster than finding the appropriate part by manually searching the library folders.
The second shortcut is to use Parameter Transfer inside the settings dialog box. Hold down the shortcut keys for the syringe tool – Option-Command (Mac) or ALT-CTRL (Windows) – and move your mouse over the preview area where you will select the new library part. You’ll see the syringe appear in place of the normal arrow cursor.
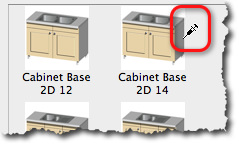
Be sure to hold the special shortcut keys down before AND during your click of the new library part. This will transfer the settings from your old part into the new one.
All parameters with matching internal variable names will pick up the correct values. The new part will most likely look exactly like the old one.
TIP: Sometimes the new part may have additional parameters that were added by Graphisoft in a library revision, so you may need to check and correct these to suit your needs.
Occasionally you may see an error or warning message after syringe-clicking to activate a new library part. In this case there may be an issue with inconsistent or incompatible parameters in the new part. Often the troublesome parameters are related to size; check these and adjust if necessary.
In rare cases, you may need to start over with the default settings of this part in order to get a satisfactory result. Simply click Cancel, then return to the settings dialog and click again on the desired part WITHOUT using the syringe option, then set it up as best you can to match the original favorite.
After reviewing the results, click OK. Your element on the plan is now using the new library, and should look identical or quite similar to the original Favorite. Follow the directions above to update the Favorite using the Redefine with Last Selection command from the palette popup menu.
With these shortcuts, each Favorite item may be quickly updated to use the new library. Repeat for each item in your list. It may take only a minute or less per favorite doing it this way. So if your list of Favorites has 100 elements, it might take you an hour and a half ONCE to update the entire list for the new version of ArchiCAD.
TIP: New library versions sometimes introduce powerful or subtle new options and capabilities. The changeover to a new version of ArchiCAD may be a good time to re-evaluate some or all of your Favorites, and rework them from scratch rather than simply updating them.
MANAGING FAVORITES IN DIFFERENT PROJECT ENVIRONMENTS
There are some other issues that can occur when Favorites are loaded into a PLN file that has different attributes than the original one. For example, if the layer for a Favorite does not exist, one will get an error message when trying to place the element into the project. In this case, simply choose an available layer and place the item, then select it and update the Favorite using the Redefine with Last Selection command.

A more subtle issue occurs when attributes such as composites do not exist that are referenced by the Favorite. For example, after activating a composite wall favorite that refers to a composite that is not defined in the current PLN, the wall that is drawn will be the correct thickness, but will show up as a simple mono-element wall rather than as a composite.
To resolve this, one needs to import the composite attribute definition into the current PLN. This can be done using the Options menu > Element Attributes > Attribute Manager. In the right side of Attribute Manager, select another ArchiCAD PLN file, and activate the tab at the top to show the Composites. Select one or more Composites that are available from the other PLN, and click Append or Overwrite to add them into the current PLN.
A simple alternative to using the Attribute Manager is to open up the earlier PLN (in which these Favorites are completely functional) in another instance of ArchiCAD. In this file, select one or more walls with these composites and copy them, then switch back to the current PLN and paste. The composite definitions are automatically added into the project Attributes by ArchiCAD.
These pasted walls will show up on the plan properly. They may be deleted after inspection since their attributes are now in the wall composite list.
After either of these approaches is used (Attribute Manager or copy and paste), the problematic wall Favorite will be fully functional, since the associated composite wall definition now exists in the PLN file.
Similar techniques may be used for missing Materials, Fills, Linetypes or other element Attributes referred to in the Favorites palette.
NOTE: When you bring in structural elements (e.g. walls, slabs, roofs, etc.) from ArchiCAD 16 and earlier into ArchiCAD 17 and later versions, you may inadvertently add new Building Materials based on the Fills used in the element or in the Composite or Complex Profile. I recommend that you check and clean up your Building Materials list after importing these elements. You can often use the Delete and Replace option to substitute a current Building Material for one that was just added as part of an import process.
CONCLUSION
Favorites are a fantastic part of ArchiCAD’s power tools. The migration of Favorites, typically done once per year or per upgrade, may be handled much more easily using the shortcuts outlined in this article. It is a small effort compared to the time saved using the Favorites palette.
By the way, a similar process can be used for migrating elements in an actual project. To complete the migration of project elements even faster, use Find and Select to locate multiple identical items (e.g. all casement windows of a certain size). You’ll be able to switch them all to the new library in a single step!
Parameter Transfer has many other applications. For more cool things you can do, please check out ArchiCAD Tips and Tricks article on The Magic of Parameter Transfer:
