ArchiCAD Tutorial | Remodels and Additions in ArchiCAD
bу Eric Bobrow, January 24, 2008
Originally Published in AECbytes Tips and Tricks Issue #26
As I’ve trained and talked with ArchiCAD users over the years, I’ve identified several different strategies for working on remodels and additions. Each approach has different strengths, and users may choose between these methods in order to handle a wide variety of project sizes and scenarios.
The basic challenge of documenting a remodel involves entering existing conditions as well as the new design in the most efficient manner, and managing what information is shown on each drawing. In general, ArchiCAD controls “what to show” by using layers, a classic method that provides tremendous flexibility. Unlike BIM solutions that try to shoehorn all design elements into preset categories, families or project phases, ArchiCAD’s layer management makes it easy to customize and control visibility of information exactly the way you need it for each project.
For typical projects, layer management in ArchiCAD is quite straightforward. Layers and Layer Combinations are set up to show whatever is desired on each drawing or during each phase or focus of work. The View definitions remember and activate layer combinations automatically, and make sure that each Drawing on the Layout sheets has exactly the right information and style. ArchiCAD’s Favorites palette records the settings of common elements, and makes it easy to draw each element with just the right layer and other parameter settings. Interactive Legends of Visual Favorites (discussed in my ArchiCAD article of December 2006) are an excellent enhancement. These legends provide a visual reference that can be accessed with the eye-dropper to pick up settings for frequently used elements.
Controlling the Visibility and Appearance of Modified Elements
For remodel projects, the necessity to control the visibility and graphic look of modified elements (either removed, added or changed) makes things a bit more complex. The four strategies I will talk about in this article are all workable options, and each has certain advantages and some limitations.
- Create separate files for the As-Built and the new Remodel designs.
- Maintain the As-Built and Remodel versions within the same file, but copied onto different stories.
- Add more layers to control Existing, Demo and New elements.
- Reference the As-Built as a Hotlinked Module into the new Remodel PLN.
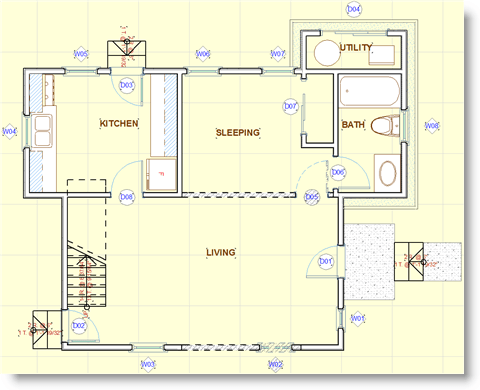
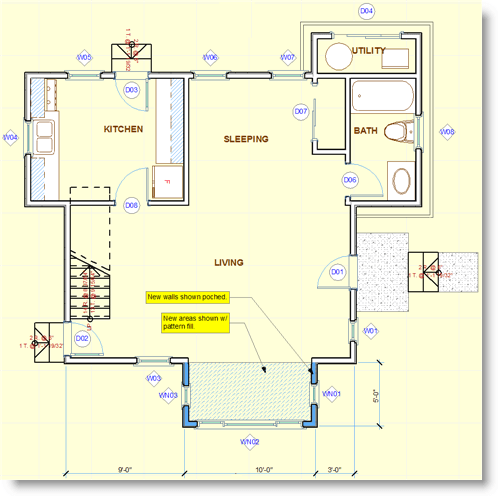
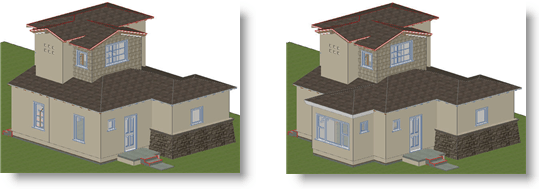
Below are examples of a small project illustrating typical As-Built, Demo and New plans. One interior wall has been removed and part of one exterior wall as well, to accommodate an addition to that side of the house.
This article is a bit lengthy since it covers each of the four strategies in sufficient detail to understand and implement. The first two approaches are quite simple, and require almost no setup. The third one needs a few extra layers and layer combinations, which can be set up in an office standard template so that everything is ready to go whenever a remodel project is started.
The fourth approach, in my opinion, is the most effective “Best Practice,” but it requires the most setup. An experienced user can implement this in the office template, or for $195, buy our ArchiCAD MasterTemplate (www.actemplate.com) where this (as well as numerous other Best Practices) has all been set up for immediate use “out of the box.”
AS-BUILT (left) and NEW (right) models
1. Create Separate Files for As-Built versus New
One of our veteran users (Van Hohman of Fonda-Bonardi and Hohman Architects in Santa Monica) keeps remodel projects very simple. He documents existing conditions in one As-Built PLN file, then copies the file to start a second one, the Remodel PLN. In the second copy of the file, the remodel design is worked on similar to any new project. In the Remodel PLN, elements to be removed (such as walls or openings) may be freely changed without disturbing the original As-Built drawings. Elements may be “exploded” into 2D graphics so they don’t show up in 3D views, sections or elevations, and can be dashed or poched as desired. Sometimes Van makes a third copy of the file as a Demo PLN for additional notes and reworked graphics.
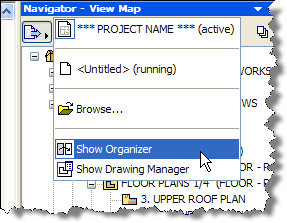
The Layout Book in the Remodel PLN will contain all the standard drawings for the new construction, and will reference Views from the As-Built and Demo files to show the existing building. To reference drawings from other PLN files, press down on the Project Chooser (the left-hand button in the Navigator palette) and pick Show Organizer.
In the Organizer, click on the top of the left-hand side on the View Map icon, and on the top of the right-hand side, click on the Layout Book icon. You’ll then be in the Organizer – Layout Editor. From the Project Chooser button in the upper left, select the As-Built PLN (it will be listed as “running” if it is currently open in another instance of ArchiCAD) or use the Browse option to locate the As-Built PLN.
The View Map on the left-hand side will show the Views from the As-Built PLN at that point. You can simply drag whichever Views are needed from that PLN onto the Layouts in the Remodel project.
The main advantage of this strategy is in its simplicity. Each PLN is separately managed, so there is no need to add any additional layers. The display of elements in each PLN can be handled as desired without affecting the other file.
There are some disadvantages, however. If you realize that some of the as-built information is incorrect or incomplete, the new or revised work needs to be done in both files. Fortunately, there is an easy way to do this if you have both files open. Simply draw or correct the elements in one file, then copy to the clipboard, switch to the other file, delete anything outdated, then paste the elements into the original position.
Another weakness of this method is that you can’t directly compare old versus new. One example of how important this can be was told to me by veteran user and trainer, Abeer Sweis of Synthesis in Santa Monica CA. She said that sometimes after removing all the existing interior walls in the project file and working out a new design, she would realize later that one of the new walls was almost in the same position as an existing wall slated to be demolished. By directly comparing the new design with the old, she is able to rework the new design to use the original wall, thus avoiding unnecessary demolition and replacement.
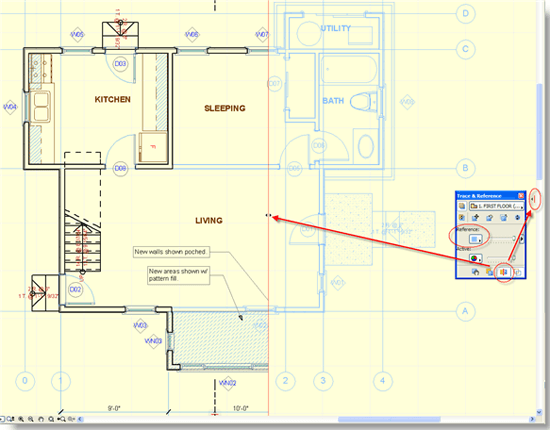
Fortunately, comparison of old versus new is easy, even between two separate files, with clever use of ArchiCAD 11’s revolutionary new Virtual Trace capability. Once one has placed the As-Built floor plan onto a layout sheet in the Remodel PLN, one can use that layout as a trace reference while working on the new floor plan. You can then compare the two plans (one “live,” the other as seen on the layout) using ArchiCAD’s new Visual Compare tools. In the screen capture below, the As-Built is shown in a blue trace and the Splitter has been grabbed from the right side and pulled back to about half-way, to facilitate comparison between the old and new versions.
One final limitation is that it is not possible to instantly switch between existing and new designs while in 3D. In client meetings, it is of course very useful to explore the design by navigating through the building in the 3D window. Since the as-built and new designs are in two separate files, to show the same viewpoint in the existing conditions requires switching between the two files and approximating the same camera position. This is not a deal-breaker, but it does need some extra steps.
2. Place As-Built and New on Separate Stories in the Same File
Abeer Sweis has worked out a somewhat different approach, which keeps all the information in the same project file. She models the existing building, then copies the as-built plans to extra “dummy” stories within the same file. For example, in a two story building, she’ll take the as-built of stories one and two and copy them to extra stories she might call -3 and -2 (assuming -1 is for Foundation and Site information). Then she’ll go on and rework the design on stories one and two, leaving the original work unchanged on those negative stories. Since each copy (existing and new) resides in separate stories, it is simple to make the drawings look exactly right in each one without affecting the other, just like in the scenario with two separate files.
When going to a 3D view, one might at first see two copies of the building, one as-built and one new. To control what is seen, use the View menu > Elements in 3D View > Filter Elements in 3D command and choose Stories to Show in 3D > From Story -1 to Story 2 (or 3 if there is a separate roof story) in the 3D window. This Filter setting is recorded with each View, so by double-clicking on a stored View, the Filter is activated and one sees just the new construction. However, when desired, the as-built can be viewed in 3D simply by choosing different stories in the Filter. And, of course, using Ghost Stories (ArchiCAD 10 and earlier) or Virtual Trace in ArchiCAD 11, one can easily compare the floor plans.
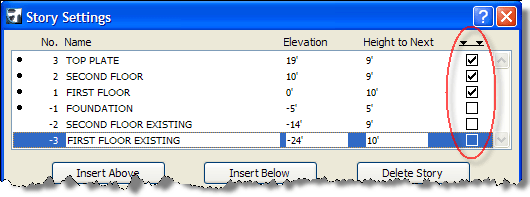
When the elements reside in the same project, there are some other precautions one must take. In Elevations and Sections, the Story Lines may be drawn automatically if desired, and these might at first show even the dummy stories. To avoid this, simply open the Story Settings dialog box (by right-clicking on any story in the Project Map or View Map and selecting Story Settings), and uncheck the Show story lines checkbox next to the dummy stories.
Sections and Elevations will show all the stories (including the dummy, as-built stories) unless one uses a Limited setting for the heights of the Section or Elevation. One needs to set the story heights of the dummy stories well below the actual new building, and tell the Section or Elevation settings to start above that level.
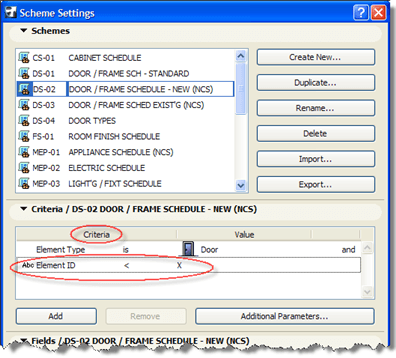
In addition, doors and windows in the as-built will show up in the schedules unless one adds a filter within the schedule scheme settings. To do this, open up a Door Schedule, for example, and click on the Scheme Settings button in the upper right. Under Criteria, click the Add button, and add one or more criteria for what elements to include in the schedule. One way is to add a criterion for Story, setting it so only elements above story -1 will be included in the schedule. This will make sure that only the doors and windows in the new stories are included. Another option is to add a criterion to exclude doors or windows that have an ID that sorts alphabetically less than “X” (see screen capture below); an “X” ID might be used for existing elements that do not need to be scheduled. Alternatively, the criteria might be set to include only doors with an ID starting with “D” (or windows with an ID starting with “W”).
The advantage of this approach is that it is simple, and only one file needs to be opened or maintained. The disadvantages are similar to the first strategy using two separate files (i.e., corrections to the as-built have to be copied between the two versions, and 3D views cannot be instantly compared without changing Filters and in this case, also camera height).
In addition, the file size will be larger, since both the old and new buildings are included in the same file. In practice this is not an issue for small and medium projects, since ArchiCAD does not calculate information in 3D, elevations or sections unless needed, and Filters and height limits will avoid any slowdowns.
3. Use Layer Management to Switch Between As-Built and New
One standard approach to working on remodel projects uses ArchiCAD’s sophisticated layer management to great advantage. New layers are defined for Demo (existing to be removed) and New elements, while Existing elements (to remain) use the standard layers.
One layer combination will show the As-Built plan using the Existing plus Demo layers, another will show the New plan using Existing plus New layers. The New layer will contain the actual new elements such as walls, as well as 2D graphics showing where old elements were demolished. These additional layers may be singular (i.e., only one Demo layer and one New layer) or multiple (i.e., wall Demo and New layers, fixture Demo and New layers, etc.).
When doors or windows in a wall are to be added or demolished, that wall needs to be drawn in two different ways, once for the as-built and once for the new design. One simple way to do this is to:
- Select the wall or walls that will change in the new design.
- Change their layer to Demo using the Info palette.
- Copy the wall(s).
- Paste (the walls will go in the same location), and click outside the marquee to confirm.
- While still selected, change the layer to New using the Info palette.
It is possible to split longer walls into more than one piece, to clarify that a part of the wall exists and will remain unchanged, while another part has both Demo and New versions.
There is one extra bit of layer management that needs to be set up just once in order for this to work properly. When layers are hidden in ArchiCAD, the default is for elements on hidden layers to “interact” with elements on visible layers, if they would interact when both are visible. This is important, since it allows walls to correctly show gaps, such as notches where columns are partially embedded, even when the column layer is hidden. However, this will cause the Demo walls to affect Existing walls in the New layer combination. The Existing walls may show gaps where Demo walls touch them or cross them, even though the Demo walls are hidden.
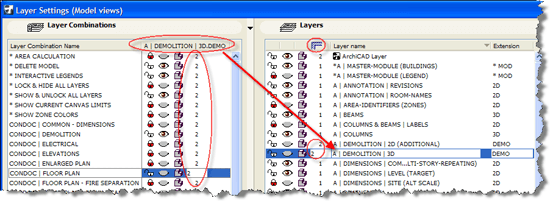
To control the interactions between visible and hidden layers, simply adjust the Layer Intersection Priorities in the Layer Combination. For example, in the As-Built, the layers for New elements (which are hidden) can be set at priority 2 so that they do not affect the Existing and Demo layers (which are set at the default priority 1). In the New layer combination, the Demo layers are set at priority 2 (to avoid any interaction), while Existing and New layers are at priority 1 to interact normally.
In the above illustration, you’ll see (on the right hand side under the icon for Layer Intersections) that all the layers have a priority of 1 with the exception of the two DEMO layers. On the left-hand side, notice that the priority for the A | DEMOLITION | 3D layer is set at 2 for each of the Layer Combinations.
Each layer combination remembers the settings for Layer Intersection Priorities (much as they record which layers are visible and/or locked), so once these are set up once, everything works very nicely.
The simplest way to set this up is to open the Layer Settings dialog, click on a Demo or New layer (on the right-hand side), then review its Layer Intersection Priority in each Layer Combination (on the left-hand side) and adjust as needed; then move on to the next Demo or New layer and repeat. Since there are only a handful of these Demo and New layers, this is a very quick process.
The main advantages of this strategy over the preceding two are:
- Only one PLN file is needed.
- There is little duplication as elements are only drawn or edited once.
- By changing layer combinations, one can switch between new and as-built versions in either 2D or 3D “on the fly.”
Revisions or corrections to the as-built are mainly done in one place. The exception is for demo elements, which are drawn once in their natural as-built style (e.g., with solid lines), then copied to the Demo layer(s) and exploded to create demo versions (with dashed lines, and possibly different fill styles).
The only disadvantage in this approach is that the layer setup is a bit more complicated. This can confuse newer users, so we recommend it for people who are a bit more experienced. Favorites and Interactive Legends may be set up to include as-built, demo and new element styles, or standard settings may be adjusted as while designing the addition or remodel.
4. Hotlinking the As-Built into the Remodel File
The final strategy we will explore is more advanced. It involves referencing the As-Built PLN file into the Remodel PLN file using ArchiCAD’s powerful Hotlinked Modules (“HLM”) technology. This similar to XRefs, but HLM’s include the full 3D model. This approach was developed by Bobrow Consulting Group consultant and architect/developer Scott Bulmer for his own work and is used in our product, ArchiCAD MasterTemplate.
The As-Built is modeled and drawn up in one PLN. A second Remodel PLN is started from the same office standard template (or MasterTemplate) with nothing drawn up at first.
TIP: It is important for the two files to have the same story height settings. If these have been modified (from the template settings) for the As-Built, you will need to do the same in the Remodel PLN before hotlinking the As-Built into it.
A special layer is needed in the Remodel PLN for controlling the visibility of the As-Built HLM (Hotlinked Module), which we’ll call *MASTER EXISTING (the asterisk at the beginning of the name is optional, but it makes the layer rise to the top of the alphabetical list). As preparation for importing the As-Built PLN into the Remodel PLN, create and activate a Layer Combination in which all layers including *MASTER EXISTING are visible and unlocked. (NOTE: All of this is already set up in MasterTemplate version 1.1, which we will release later this month.)
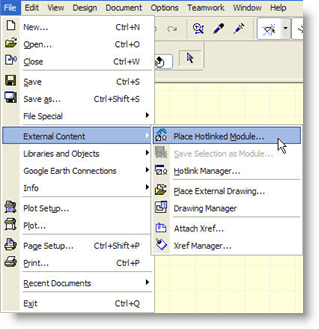
Choose the File menu > External Files > Place Hotlinked Module command.
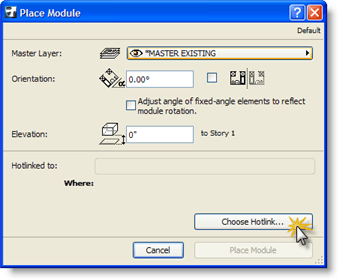
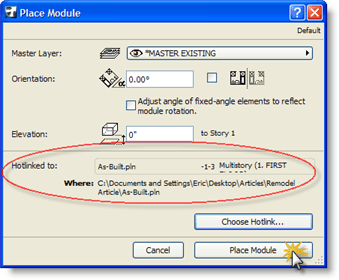
In that dialog box, choose *MASTER EXISTING as the Master Layer, and leave the Orientation and Elevation at 0. (Note: There appears to be a small bug in the current build of ArchiCAD regarding this elevation setting; if elements come in at the wrong elevation using a zero value, try setting this to -10′ or whatever value works.) Click the Choose Hotlink… button.
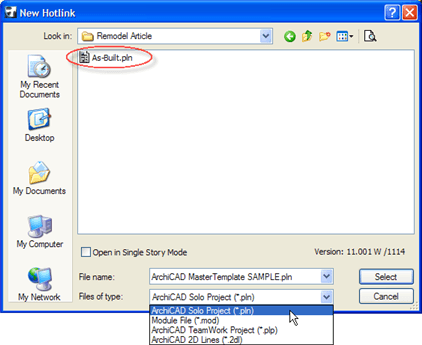
Select New Hotlink…. Be sure to choose ArchiCAD Solo Project from the file-type popup at the bottom of the dialog box, then choose the As-Built PLN file and click Select.
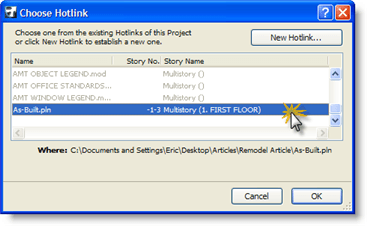
In the Choose Hotlink dialog box, highlight the As-Built PLN in the list, then click OK.
You’ll then return to the Place Module dialog box, which will now have the Hotlink info filled in for the As-Built PLN. Click on the Place Module button.
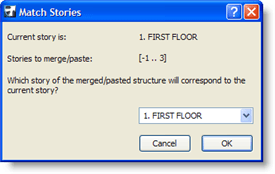
Next you’ll see the Match Stories dialog, in which you’ll make sure that the correct story of the As-Built HLM is matched to the stories of the Remodel PLN.
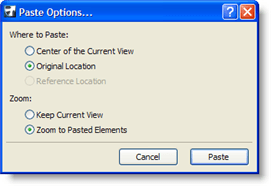
Click OK and you’re now about to Paste in the HLM (Hotlinked Module) of the As-Built project PLN. We recommend that you paste this into the original location, so that updates and coordination between the two files are simplified.
Click the Paste button to bring in the Hotlinked Module, then click outside the paste marquee to confirm the placement of the HLM in the file.
In the Remodel PLN, you should now see the entire As-Built project, with all layers turned on. To see a floor plan or reflected ceiling plan (for example), you’ll need to edit each Layer Combination just once to turn on the *MASTER EXISTING layer. Then the Layer Combinations as well as Views will show the existing building properly.
Model the new elements being added to the design, adding them to the existing building. (Tip: For new 3D construction elements, alter the background fill pen so that they stand out when next to existing elements).
Identify elements or portions thereof that need to be demolished as a result of the new design. IMPORTANT: these demolition items are manipulated from the As-Built PLN. It’s best to open the As-Built PLN file in a separate instance of ArchiCAD, so that you can switch back and forth as needed. Place those items to be demolished on a DEMO layer, and resave the As-Built PLN.
TIP: To coordinate revisions to the As-Built for demolition, you can select elements from the Remodel design and copy them to the clipboard, then switch to the As-Built. Paste them into the Original Location and you will then be able to see exactly what has to be demolished. Then delete these temporary copies from the As-Built.
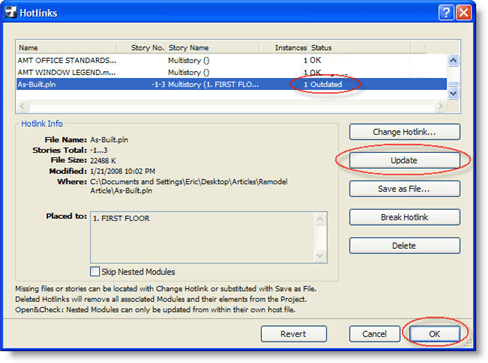
Back in the Remodel PLN (the second file), update the HLM for the As-Built PLN by going to the File menu > External Content > Hotlink Manager. You’ll see that the As-Built PLN is now Outdated. Click the Update button, then click OK to confirm and exit.
The demolition items are now easily controlled by the DEMO layer(s). (Tip: Make sure layer combinations are updated so that demolition layers do not interact with elements on other layers).
The As-Built PLN creates the Views for Existing plan drawings right from the 3D model and traditional View map, and these can be imported into the Layout Book for the Remodel PLN as in strategy 1.
Demolition plans are easily created in a Worksheet in the As-Built PLN using the following steps:
- Use a marquee set to single story (thin marquee) and copy the first story that will require a demolition plan.
- Create a new Independent Worksheet and paste. (Note: Entities are now converted into 2D).
- Make all layers invisible except the A | DEMOLITION.3D layer. (Note: This will isolate all items to be demolished).
- Change fills and line types in these remaining elements to represent demolition items per your office standards.
One variation of this approach is to reference the HLM from a saved MOD (module) file instead of the As-Built PLN itself. This allows the HLM inside the Remodel PLN to show only part of the information from the As-Built. For example, the Dimension layer might be left out of the MOD file so that appropriate dimensions may be added in the Remodel PLN without conflict from previous dimension strings.
To save a MOD file, simply turn on the desired layer combination (for example, one which turns off the Dimensions layer), then draw a multi-story (thick) marquee around the entire building. From the File menu, choose External Content > Save Selection as Module, and then name and save the MOD file. In the Remodel PLN, when selecting the Hotlinked Module, choose MOD > Module File as the file type instead of PLN > ArchiCAD Project. All the rest of the steps are the same.
The advantages of this final strategy using Hotlinked Module referencing are several-fold. Additions and changes to the As-Built are done only in one file, and referenced automatically in the Remodel. Either version can be seen in the Remodel file by flipping the DEMO layers on and off. Only a very few layers are added to the file, a MASTER layer for HLM control, and a couple of DEMO layers (for 3D and 2D elements). The As-Built and Demolition plans are managed within the As-Built file, and the Remodel PLN is focused on the new design only. In many ways, it combines the simplicity of strategy 1 (two separate files, each controlling their own graphics) with the ability to switch on the fly between the old and new versions that is a strong point of strategy 3.
The only real challenge of this approach is in understanding Hotlinked Modules and layer management enough to set it up properly. Once set up (which doesn’t take much time but does require some more advanced skills), it works very simply and easily.
This is why Bobrow Consulting Group has adopted this HLM approach in the ArchiCAD MasterTemplate. It fits our philosophy to embody the Best Practices for using ArchiCAD in the structure of the template, but make it easy on the user: “We Set It Up, So You Don’t Have To.” For more information on the ArchiCAD MasterTemplate, please visit www.actemplate.com. For an interesting discussion of how to work on remodels using MasterTemplate, browse the BCG ArchiCAD Forum topic https://www.actemplate.com/support/support-forum/Best-Practices/Remodels-and-Additions-in-ArchiCAD/.
All four of the strategies outlined are effective and can be adapted for projects of varying sizes. One of the real strengths of ArchiCAD is that it provides so much flexibility to the user. It’s really up to you whether you want to “keep it simple” or would like to try out another approach to see which will be the “Best Practice”—for you and your office.
To give me feedback or ask questions about this article, please send an email to article@bobrow.com. I look forward to hearing from you!


