ArchiCAD Training | Learn to Model Better – The Sixth Key to Best Practices
 This is the sixth installment in my 7 Keys to Best Practices mini-course. If you missed any of the earlier lessons, you can find them here on this website in the section on free ARCHICAD TRAINING.
- Please keep emailing me and posting your comments and feedback on this website. I’m enjoying reading them as they come in from all over.
One person from Chile wrote “Following your ArchiCAD emails, which are incredibly useful. Would be nice to be in touch. And thanks for your answer to a comment I made of your third installment some days ago!”
In the past few days I’ve gotten thank-you notes from China, Russia, Spain and India, among other countries. The Russian wrote “I am very happy I found the man who will help me achieve what I need to do in ArchiCAD.”
I write back to every person who sends me a note. It makes me happy.
Speaking of things that make me happy, modeling in 3D in ArchiCAD is a lot of fun. I love doing it, and I’m especially satisfied when this enjoyable work pays off by not having to draft very much in 2D. I don’t know about you, but drafting for hours is not my cup of tea.
MODEL WELL, DRAW LESS
The sixth key to Best Practices is to model as well as you can, so you can draw less and less.
ArchiCAD is able to generate beautiful 2D drawings directly from the 3D model if you create your model well. Start by mastering basic modeling techniques with proper snapping and alignment. Supplement the basics with more sophisticated approaches such as complex profiles and solid element operations.
You’ll then be able to create elegant and beautiful sections and elevations that are virtually complete directly from the model, and require almost no cleanup or additional line work.
WHAT COULD GO WRONG?
Here’s one area that many users stumble over. If you stack elements on top of each other so they have the same surface material and the same plane, then ArchiCAD generally will remove the line in between them. This is certainly true for generic elements like walls, slabs and roofs that combine nicely.
However, if something’s a little bit off, you will see an extraneous line in your elevation. Perhaps one element is actually in front of the other one, or there’s a slight gap or overlap because their heights aren’t coordinated.
You can use Virtual Trace to align things cleanly and make sure that you’re snapping properly.
If you do it right in 3D you won’t need to clean it up in 2D.
Here’s a simple tip that may save you some frustration. Sometimes you may have the end points or nodes of several elements very close to each other, but not quite on top of each other (as they should be). That may make it hard to clean up, even if you zoom in, since when you adjust a node it may snap to itself or to another node that isn’t exactly in the right place.
A simple technique is to move all but one of the nodes away from the area, and make sure the remaining one is in correct position. Then move each of the others back, snapping easily to the good one.
WHAT ABOUT THE SECTIONS?
Many users incorrectly assume that section drawings always require a lot of manual cleanup. This depends a lot on your modeling skill and how you approach this task.
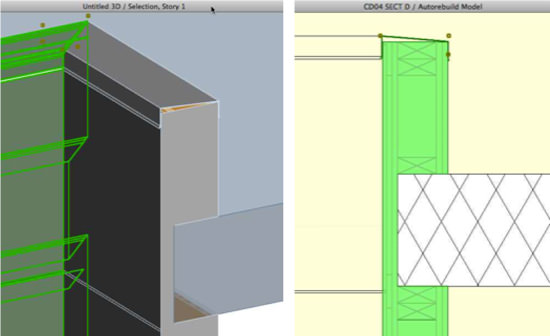
For example, your section doesn’t have to look incomplete or “wrong” if you use a complex profile that represents the wall with framing and sheathing integrated.
In addition, you can make the structural slab penetrate the wall to the framing line, and use Solid Element Operations as needed to remove the overlap. Voila, your section drawing will look great right away. Put in a bit more effort in 3D and save a lot of time in 2D!
LEFT: 3D Cutaway of complex profile wall intersection a simple flat roof slab (which is made translucent for presentation purposes; note the green selection highlighting the left-hand wall element, showing it is notched to allow space for the slab and includes the waterproofing at the top.
RIGHT: Section of the same intersection, with wall selected in green. Note that the framing is actually part of the wall’s complex profile in 3D, and is not drawn manually in 2D!
WHY DRAW AT ALL?
Of course, you’ll still need to add text, labels and dimensions to annotate your drawings. And there will always be detail drawings, which show things in an enlarged view that would be tedious if you tried to model them throughout the building.
However, with ArchiCAD you can rethink some of the assumptions that come from previous CAD methodologies. In some cases details can be derived from the model that are accurate enough that you can draw right on top of the model, without needing to redraft the model linework.
Often you can use intelligent 2D GDL objects to drop in framing or structural components and stretch them to suit the context, rather than drawing lots of separate lines and arcs.
Keep stretching your limits by seeing how little you can draw, and you’ll be happier for it!
I hope you enjoyed this lesson as much as I did creating it for you. Please send me an email or post a comment on this website telling me how you are applying what I’m teaching you.
Best regards,
Eric
P.S. The final key to Best Practices is to keep things safe – developing and following effective habits for saving your work from day to day and over the long term. Watch for it in your inbox soon!
By the way, if you like these free tutorials, you’ll love my Best Practices ArchiCAD training course – a comprehensive training on how to use ArchiCAD really well. Reopening May 24!

