ArchiCAD Tutorial | ArchiCAD’s 3D Views and 3D Documents
bу Eric Bobrow, November 1, 2008
Originally published in AECbytes Tips and Tricks Issue #35
ArchiCAD makes it easy to create a Virtual Building, a 3D Building Information Model (BIM) of an architectural design while simultaneously developing coordinated 2D construction documents.
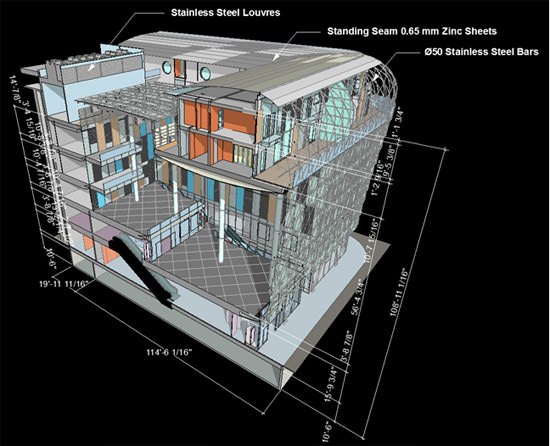
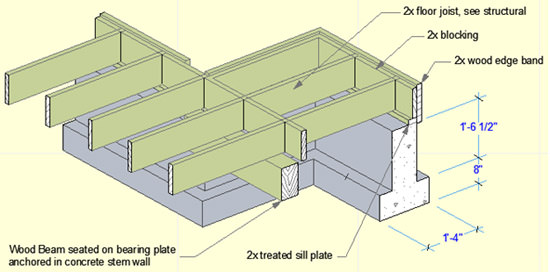
This article will catalog the various ways a BIM model can be viewed in 3D in ArchiCAD. We’ll quickly go over the basics while sprinkling in some tips about little-known options that provide great variety, freshness and flexibility. We’ll also discuss how to save these Views in the View Map for later reference. We’ll end with a description of ArchiCAD 12’s powerful new feature that allows 3D views to be turned into “live” automatically updatable 3D Documents complete with dimensioning and annotation. The figure below is an example of a 3D Document showing a building cutaway along with dimensioning and other annotation. Note that the black background is simply a black fill placed behind the construction elements and notes
There are many controls and options for looking at the 3D architectural model:
- Projection type – perspective or axonometric
- Shading style – wireframe, hidden-line or shaded (with special mixed effects possible)
- Element filtering – controlling visibility by layer, selection, marquee, element type, story or cutaway
One may interact with the 3D window to view the design from a different vantage or to edit the model. ArchiCAD has built-in Photorendering tools to generate presentation-quality images of any 3D window view, with variations such as Internal, Lightworks and Sketch styles. These renderings may be placed onto Layout sheets or saved for external use.
3D View Mode
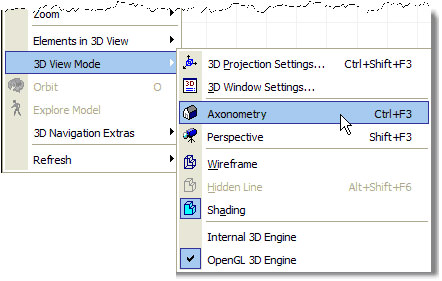
The View menu > 3D View Mode submenu allows a choice of both axonometric and perspective views of the model.
When either is chosen, the 3D window will bring up the appropriate view type using the last camera or reference position. One may also choose using keyboard shortcuts (PC: Ctrl+F3 vs. Shift+F3, Mac: CMD+F3 vs. Option+F3) or from the 3D Window popup menu in the Toolbar.
An axonometric view will automatically zoom out to include all of the current model, while a perspective view will show what is seen from a particular camera vantage point using a specific angle or cone of vision.
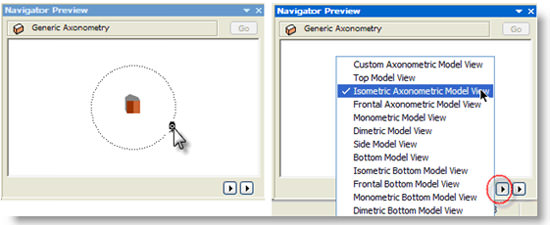
The Navigator Preview window can be called up using the shortcut button that is second in the sequence in the bottom left of most windows.
For an axonometric view, the Navigator Preview allows one to manually rotate the view by dragging the camera icon in an orbit around the building icon. Standard angles are available from the popup, including isometric, top, side, and other less common projections.
One may also change the rotation angle as well as the “height” using the Orbit command.
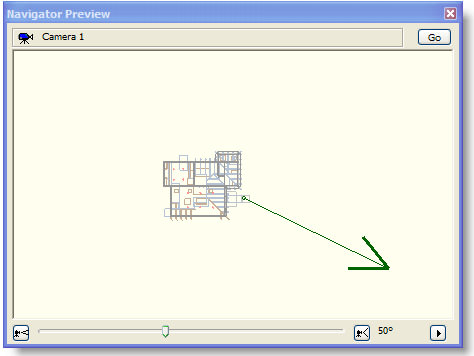
For a perspective view, the Navigator Preview will show a miniature of the floor plan, along with an indication of the camera position (where you are looking from) and target position (where you are looking towards). You may move either the camera or target with the mouse, and will see the 3D view change simultaneously. You may also adjust the view cone angle with the slider at the bottom of the Preview window.
TIP: Sometimes it is hard to see the building plan and camera clearly because they are so small in the Navigator Preview window. The preview always shows the plan view with the currently visible elements (based on the current or last visited story, and what layers are turned on) zoomed out to Fit in Window. You may enlarge the Preview window by undocking it (grab it by its title bar and move it away from the docked or snapped position) and resizing the window. This will make the preview resize proportionately. You might also consider turning off one or more layers that have elements extending beyond what you need to see; for example you might turn off the layer for the site terrain mesh. After hiding the layer(s), use the Redraw Preview option from the popup menu at the bottom right of the Preview window.
You may set the perspective viewpoint precisely by using the Camera tool. Activate the Camera tool, click to place a camera and click again to set the target point. Select the camera, then go to 3D, and you’ll be looking from that camera position. The camera will remain on the plan until hidden or deleted, and you may have multiple cameras in the project if you wish.
To look at the 3D model from a particular camera position, simply select that camera on the floor plan and go to 3D. All cameras show up in the Project Map, and you can double-click any of them to switch to that viewpoint.
TIP: Cameras will not print with the plan view, however they can get in the way while you’re working. To hide them, double-click the Camera tool to open up the Camera Settings floating dialog box, then click the Path button, and from the Display Options popup choose None. Another, quicker way is to activate the Camera tool, make sure no cameras are selected, and choose a different Camera mode (e.g. VR Object or VR Scene) from the Info Box geometry methods.
If you move around in the 3D window using the Orbit or Explore modes, or zoom in or out with the mouse wheel, you may record your current position for later use. From the View menu > 3D Navigation Extras, select either Add Current Projection (for axonometric views) or Put a Camera into the Path (for perspective views). Other options are available from the same submenu (for perspective views when a Camera is selected on the floor plan) to modify the selected Camera, insert a new Camera, or go to the previous or next Camera viewpoint.
TIP: One of my favorite shortcuts is to Orbit in the 3D view by holding down the Shift key while pressing the mouse scroll wheel. Simply move the mouse to Orbit the view—and this works both in axo or perspective! When you let go, you’ll be instantly back to editing mode.
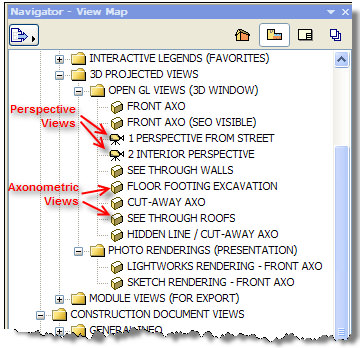
While in any 3D view, you may use the Save Current View command in the View Map. This will record the entire context of your current view: the vantage point and projection type, layer combination, shading style, element filtering, etc. When you double-click one of these Views, you’ll be back in the 3D window with the exact same context but updated to show the current model geometry. The figure below shows saved 3D views—perspectives and axos with special effects—from the ArchiCAD MasterTemplate.
Shading Style
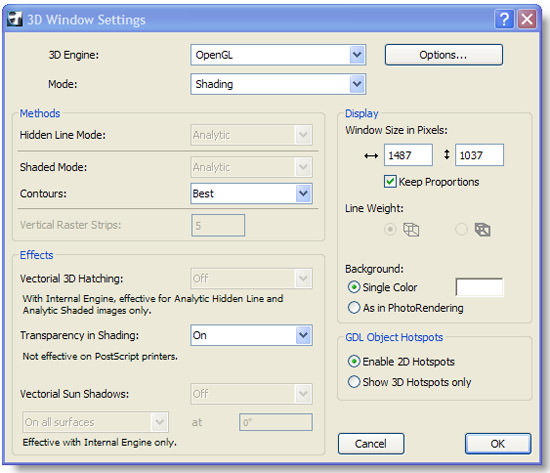
The 3D window may be viewed in several different modes. From the View menu > 3D View Mode > 3D Window Settings, one may choose between wireframe, hidden line, and shaded options. Each of these will look slightly different depending on whether the OpenGL or Internal Engine is active.
The main settings in this dialog (Wireframe/Hidden Line/Shade; OpenGL/Internal Engine) can also be chosen directly from the View menu > 3D View Mode menu.
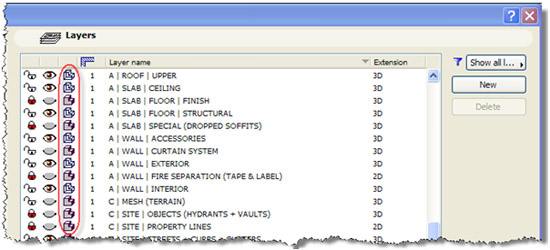
One or more layers may be shown in wireframe using the Layer Settings dialog (Document menu > Layers > Layer Settings or CTRL-L / CMD-L). Simply click the icon for Solid/Wireframe to toggle the visibility style for any layer:
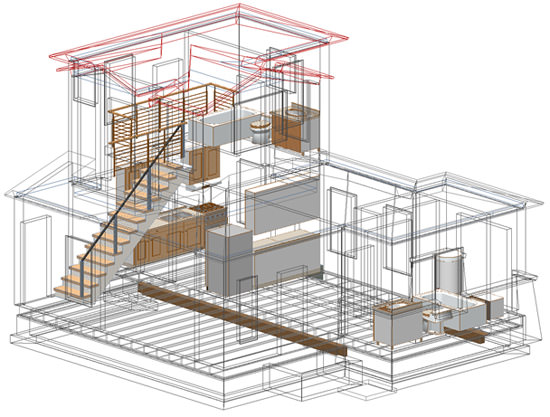
Here is a view of a building with the layers for roofs and walls set to wireframe, and doors and windows turned off (the openings still show) in the Filter Elements in 3D settings.
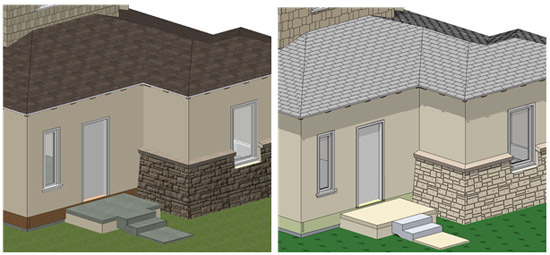
OpenGL mode is a fast view that allows material textures to be seen (based on simple JPG or TIF graphics to simulate brick, wood, etc.). The Internal Engine takes more time to process, but allows special effects including Vectorial 3D Hatching (linework that simulates materials) and Vectorial Sun Shadows (shaded fills with optional Contour outlines to show the shadows on surfaces). The figure below shows the contrast between the OpenGL mode, shown on the left, and the Internal Engine mode (with optional Vectorial Hatching and Sun Shadows), shown on the right.
The Internal Engine can take a while to generate, particularly for very large models with lots of polygons (typically either very large buildings or models with lots of intricate detail or trees). If you want to use the Internal Engine to see shadows but the processing time is too long, you may switch the Shaded Mode from Analytic to Raster, since that takes less time.
Vectorial Hatching is only available with Analytic mode, and adds some time, but not as much as Sun Shadows. In general, it is advisable to turn these features off when not needed, or use OpenGL, which simulates materials with JPG textures instead of hatching and does not generate shadows.
TIP: Selecting Contours Off for Vectorial Sun Shadows does NOT turn off shadows—it simply generates them without an outline. To turn off Sun Shadows while using the Internal Engine, you must choose Off instead.
Element Filtering
There are many ways to filter elements in the 3D view. The simplest and most basic is by turning on and off layers, either manually or with layer combinations. Layers that are visible will be seen in plan, section, elevation and 3D views, while elements that are on hidden layers will not be shown.
Another way to limit what is seen in 3D is to select some elements on the floor plan (with the arrow tool, shift-clicking, or using Select All of a certain element type from the Edit menu). To show only those elements in 3D, choose the command from the View menu > Elements in 3D View > Show Selection/Marquee in 3D. You may also right-click and choose Show Selection/Marquee in 3D, or use the keyboard shortcut (PC: F5; Mac: F4).
Similarly, if a marquee is drawn on the floor plan, the elements within that marquee may be viewed in 3D using that same option. The marquee can be rectangular, a rotated rectangle, or a polygon, and interesting effects can be achieved by delineating a complex polygon and then going to 3D.The Marquee tool has a heavy option which will show multiple stories, and a thin option which only shows elements on the current story. These options are selected in the Info box next to the symbol for the Marquee, in the area commonly used for geometry method and construction method. The images below show a polygonal heavy marquee followed by the multi-story cutaway view that it generates.
Even though a marquee will show only part of the model, all elements may still be selected and edited. When selected, cut-off elements will show handles beyond the marqueed area, to give a visual indication that only part of the element is visible (see image above). Note that if you move an element in 3D while a marquee is active, it is possible for the boundary to cut off part of the element, or even to prevent it from being seen in its new position (if it is totally outside the boundary).
TIP: You may also select elements directly in the 3D window, then right-click or use the keyboard shortcut to Show Selection/Marquee in 3D—this will isolate those particular elements, hiding everything else. To see the entire model in 3D, choose Show All Elements in 3D instead of Show Selection/Marquee in 3D. This option can be chosen from the floor plan, or while in the 3D window. Of course, this will still only show elements on visible layers.
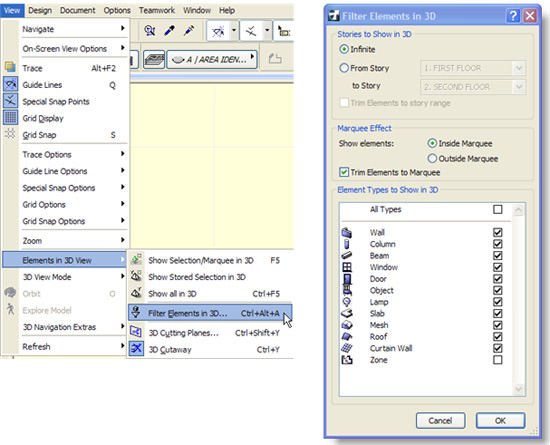
There are additional controls available in the View menu > Elements in 3D View > Filter Elements in 3D dialog.
One may turn off categories of elements such as objects or roofs, which will simplify the 3D view, or restrict the view to only certain stories.
When a marquee is used, the default Filter Elements in 3D setting is to show only what is within the marquee, trimmed like a cookie-cutter. However one may change the preference to show what is outside the marquee (so it can quickly “gut” the building). One may also choose to include the full extent of all elements in the marquee (rather than trimming them at the marquee boundary).
One of my favorite tricks for working on very large and complex projects is to turn off windows and doors—then one sees simplified walls in 3D with cutout openings instead of actual windows and doors. This makes it much faster to work in 3D or elevation views. I also use this for previewing and testing animations and walk-throughs, since each view is generated more quickly but one still can get a good feeling for the pacing and framing of the camera path.
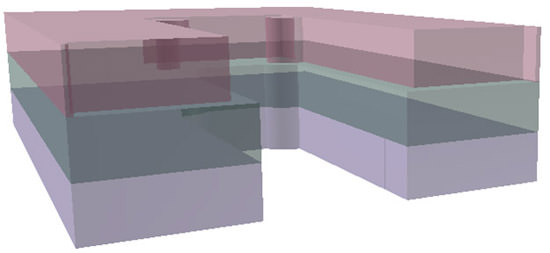
Another special effect available in the Filter Elements dialog is to turn on Zones in 3D. Zones are frequently used to delineate rooms or usage areas on the floor plan, but can also be visualized as volumes in 3D for massing, blocking and stacking studies. Extrusion heights are set as in each zone’s settings dialog. Zones may also be trimmed to fit under sloping rooflines using Solid Element Operations.
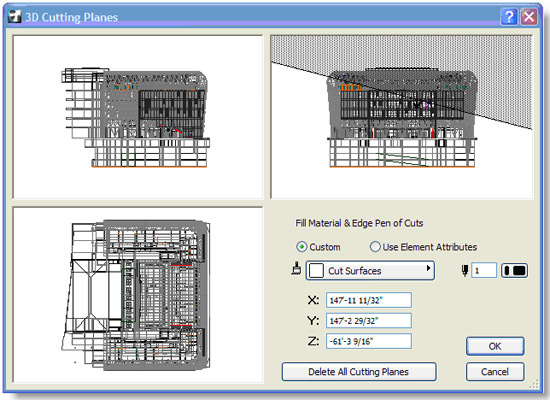
Cutaways for presentations and study of the model may be set up using the View menu > Elements in 3D View > 3D Cutting Planes. This window shows the top, side view and front views of the current 3D window, and allows one to draw lines representing cutting planes in any of the 3 views. Two clicks determine a cutting line/plane, and a third click specifies which side is cut away. To cut at a specific height or location, one may type in a coordinate value and hit the Enter key, then use the Shift key to constrain the second click to the same height. The figure below shows 3D Cutting Planes with a single cutaway invoked, followed by the resulting angled cutaway view.
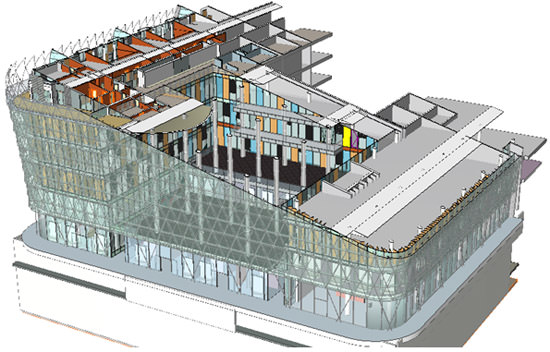 The cutting planes are retained in the 3D Cutting Planes dialog for future reuse, but may be cleared (to start over) in that same dialog by double-clicking any individual cutting plane or using the button to Clear All Cutting Planes.
TIP: The cutaway effect is turned on or off using the 3D View menu > 3D Cutaway command.
Cutaways are also stored in View settings, so saving a View with a cutaway active allows one to return to that same context at a later time.
Presentations: Photorenderings, Animations and Sun Studies
Any 3D view can be rendered using ArchiCAD’s built-in Photorendering options, or turned into a walkthrough or fly-around animation or a sequence of images for a sun study.
Photorendering options are set in the Document menu > Creative Imaging > Photorendering Settings. Basic texture mapping and shadows are available in the Internal Engine, with fancier effects such as soft shadows and reflections available using Lightworks. In addition, a Sketch mode allows presentations to be made with more of a hand-drawn look, with many variations in and of itself.
Multiple cameras can be placed on the floor plan to create an animation path, and a walkthrough or fly-around can be generated and saved as a QuickTime file for later playback by the designer or client. Sun studies can easily be generated from any viewpoint, with an automatic heliodon calculating automatically the sun positions through various times of any day of the year, appropriate for the specific site location.
ArchiCAD’s capabilities in this area are worthy of a separate article, since these tools are very comprehensive and powerful. I will not elaborate further here.
The New 3D Documents in ArchiCAD 12
Graphisoft pioneers this year a new type of drawing, the 3D Document. The key innovations are that 3D views may be annotated (including easy and elegant dimensioning) and automatically updated (much like elevations and sections).
Any 3D viewpoint may be turned into a 3D Document by selecting Document menu > 3D Documents > Create 3D Document. One may also right-click within the 3D window, making sure not to have anything selected, and choose Capture Window for 3D Document.
3D Documents are a new category in the Project Map, along with Stories, Elevations, Sections, Details, Worksheets, Interior Elevations, etc. When creating the 3D Document, a standard dialog box comes up for setting the reference number and name of the viewpoint in the Project Map.
The new 3D Document will have the same viewpoint (axo or perspective) as the original 3D window view, but it will be converted into a style similar to the Internal Engine. This means that it will not have textures (i.e. JPG versions of materials) but instead will have solid colors for the surfaces, with optional Vectorial Hatching and Sun Shadows.
Most of the 2D tools may be used to annotate the drawing, including text, labels, linework (lines, arcs, polylines, splines), fills and dimensioning. Labels may be placed independently (a leader line and editable text) or associated with 3D elements (which can have a leader line and/or a symbol such as a hexagon or rectangle, along with text based on the type or ID of the associated element).
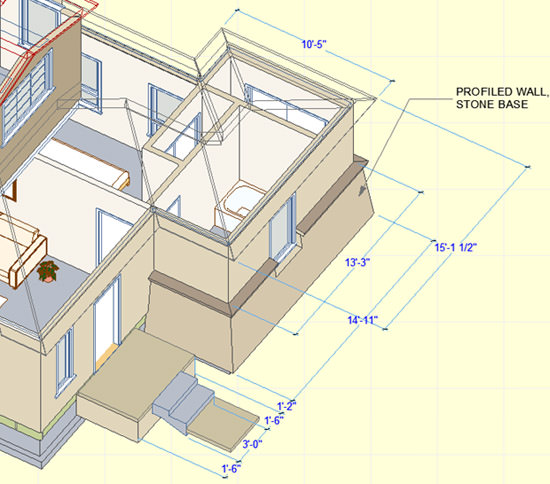
Dimensions will snap to element node points much like on the floor plan or while editing in the 3D window. Three distinct geometry options in the Info Box allow distances to be calculated based on horizontal displacement, vertical offset, or along any plane (such as the edge of a roof).
Dimension strings are “pulled out” from the model, with witness lines extending in accordance with the angles of the perspective or axonometric projection. Once placed, the dimension plan may be offset for graphic clarity, using one of the options from the popup editing palette. A full description of the special way that dimensions work for 3D Documents is available in the ArchiCAD Help system.
The 3D Document by default is set to automatically update whenever it is viewed, which means that it will always be consistent with revisions to the model. Dimensions will adjust as needed, as will labels that are linked to building elements.
3D Documents can be created from any 3D Window View, which means that they can include marqueed areas of part of the model, as well as 3D Cutaways. An example of a foundation cutaway using a marquee is shown below.
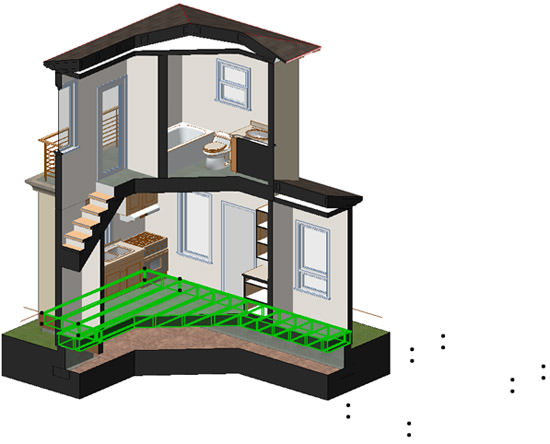
It is even possible to have certain layers in wireframe, just like in the 3D Window, as shown in the figure below where the roof layer is shown in wireframe.
There are a few limitations in the 3D Document window compared to the standard 3D Window. One cannot interactively change the viewpoint angle, and cannot draw new 3D elements, or stretch or move existing 3D elements. However, it is possible to select elements and view or change their settings using the Info Box or Settings dialog.
To edit the model normally, one may return to the standard 3D window or work in the floor plan. To view the model from the actual viewpoint of the 3D Document, one can right-click anywhere in the window (making sure nothing is selected) and choose Open 3D Source.
It is possible to change the angle or shading style of the viewpoint once the 3D Document is created. Open the standard 3D window (possibly by the aforementioned Open 3D Source) and reposition the viewpoint as desired. Then bring the 3D Document window to the front, and right-click anywhere (again making sure nothing is selected) and choose Redefine Based on Current 3D. Note that dimension strings will not adjust to fit the new viewpoint angle, and may need to be deleted and recreated.
TIP: If a marquee is used to generate the 3D Window, and this is captured for a 3D Document, there is one small caution. Dimension references snapped to endpoints created by the marquee (i.e., “artificial” endpoints that come from the marquee cutting off part of the element) are static. This means they will not update if (for example) a wall has a new height or thickness. To ensure a dimension will automatically update, snap the dimension reference (wherever possible) to a “natural” endpoint of the element (i.e., where that wall actually ends).
The new 3D Document may be printed or saved much like any other view, or placed as a Drawing onto a Layout.
Conclusion
ArchiCAD has unexcelled tools for creating a wide variety of views of a BIM model. The 3D Window allows the designer to study and work on the building design from any angle and to focus on any part of the model or combination of elements. Integrated presentation tools make it easy for users to show the latest version of the design beautifully rendered or animated.
The new 3D Document facilitates communication of the design to clients, consultants and builders. It makes it easy to save any view and annotate it and place it on a Layout, while maintaining it up to date like all the rest of the documentation. The 3D Document is one more example of Graphisoft’s cutting edge technology that transforms documentation and sets the state of the art for BIM solutions.

