ArchiCAD Tutorial | Optimizing Detail Creation, Referencing and Cataloging in ArchiCAD: The Detail Marker Tool and Detail Drawing Window (Part 1 of 3)
bу Eric Bobrow, March 27, 2007
AECbytes Tips and Tricks Issue #16
Detail drawings are one of the most important (yet sometimes under-appreciated) parts of the architectural design and documentation process. They can be very time-consuming, often involving meticulous 2D drafting for each separate drawing, as well as careful placement into the construction document set and coordination of callout references.
ArchiCAD’s Detail Marker tool, dedicated Detail Drawing windows, extensive collection of intelligent 2D object library components, and its free downloadable Detailer template are wonderful gems that help to make ArchiCAD a power-house for 2D documentation of the Virtual Building.
ArchiCAD has an incomparable combination of
- hyper-linking of detail callouts to their editable drawing windows
- automatically updated references from the callouts to their placed detail drawings
- intelligent object components to speed creation of the drawings
- an elegant template for graphic consistency and neat arrangements, and
- quick shortcuts to access frequently used components and settings
I would put ArchiCAD’s detail drawing tools and process up against any 2D CAD program or 3D BIM program. The detail process is elegant and works beautifully, efficiently and very quickly.
In this month’s first article of a three-part series, we’ll look at creating detail callouts as well as editing, placing and referencing detail drawings. Next month, the second article will explain how to use intelligent 2D object components (from the standard ArchiCAD library) as well as the Detailer template to work on these drawings more quickly and efficiently. The third article (to be published in May) will focus on compiling, managing and integrating your own libraries of details.
Detail Markers
The Detail Marker tool is in the Document section of the ToolBox.
When one activates the Detail Marker tool, the Info Box will display current settings for placing a new Detail callout. When a Detail Marker is placed with a clipping area (using a rectangle or polygon outline, as shown below), a new Detail Window is created with a 2D copy of the elements that were included in the bounding rectangle or polygon.
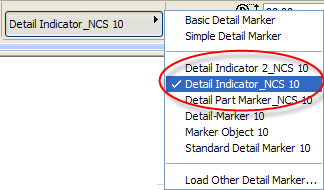
There are a variety of callout marker styles available, including some that show a clipping area and others that simply point to and/or denote a detail reference.
The basics of ArchiCAD’s Detail drawing process can be learned from several sources:
” ArchiCAD 10 Reference Manual (book or Help menu PDF, p. 124-127)
” Help menu / ArchiCAD Help (see Detail Drawings, Detail Markers, etc.)
” Thomas M. Simmons’ excellent “Step by Step Training Guide for ArchiCAD” (p. 271-282), published by Archvista and available through any ArchiCAD reseller
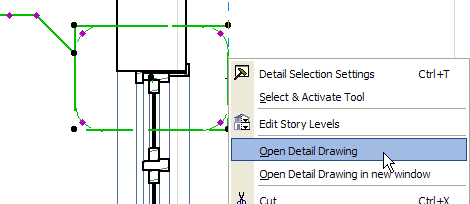
A brief synopsis of the process may help to clarify it. After placing a Detail Marker, there will be a new entry in the Details part of the Project Map, which represents a new 2D drafting window for editing and adding to the copied 2D information. You can open this window up by double-clicking on the Detail in the Project Map, or right-clicking on the Marker callout and choosing Open Detail Drawing.
In the Detail window, you will usually change the scale for the drawing, then edit the copied 2D graphics and add additional linework and annotation. Ultimately, you will save a View of the Detail Drawing in your View Map, and place it on a Layout Sheet.
The callout for the detail can show its ID (“D01” in screenshot below) and Detail Name (“DETAIL”), or reference the drawing number and sheet number once the detail has been placed on a Layout. (Before the detail is placed, these will show as “Undefined.”) The references are maintained automatically by the program, reducing your work and guaranteeing consistency for your drawings.
The Detail Marker can be copied and pasted elsewhere to link to the same Detail Drawing, so you can right-click and Open Detail Drawing from any marker. New Detail Markers, before or after being placed, can be linked to the same Detail using the Link To button, which allows you to select any Detail Window in the Project Map. The Link To option is best chosen before placing the new marker, since if a Link has not been specified, a new Detail Window will be created in the Project Map. A superfluous Detail Window may be manually deleted: highlight the unneeded Detail in the Project Map and click the red X to Clear the Detail Drawing.
Each Detail Marker can be configured with a different style (e.g., a callout with a line and flag, or simply a reference without a leader line) yet still link to the same Detail Drawing. This is ideal for other types of Views (e.g. a floor plan callout of a Window Header originally clipped from a section).
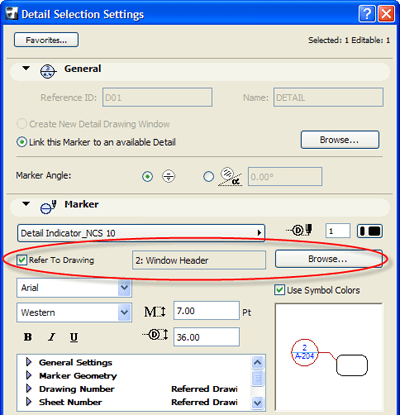
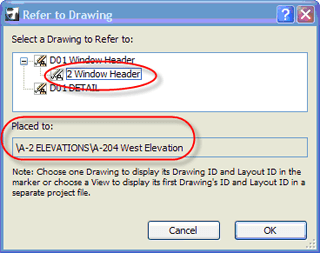
Each linked detail marker will need to be set to Refer to Drawing (either in the Info Box or in the Detail Selection Settings dialog) so that the callout shows the correct drawing and sheet numbers.
You may need to click the popup triangle or Browse… button to choose the Drawing (placed on a Layout) that the marker should refer to (e.g., 2/A-204).
Detail Callouts and Naming
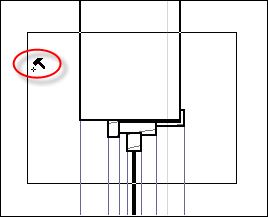
There are some steps when creating and adjusting the marker that often need clarification. When using the rectangular clipping method, after clicking two points to define the clipping area, a third click with the “hammer” icon places the callout reference with leader line.
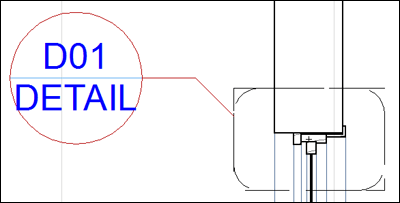
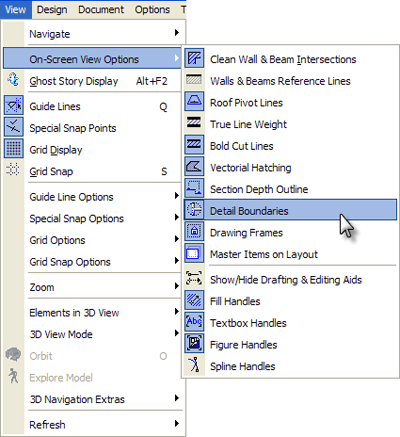
The clipping polygon can be shown or hidden using the View menu > Onscreen View Options > Detail Boundaries command.
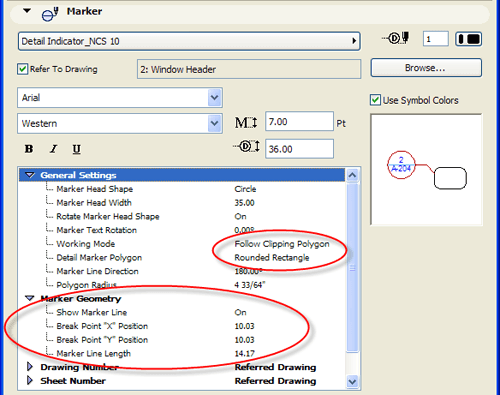
If you want to change the shape of the detail marker, you may do this after the fact. The geometry of the marker is one of the parameters in the Marker panel of the Detail Selection Settings.
If the Working Mode is Follow Clipping Polygon, to change the size of the marker you must adjust the clipping polygon (the original rectangle or polygon shape, which will show with black handles when you have the marker selected) using the standard pet palette editing for polygons. (The diamond-shaped editable hotspots at the curves allow onscreen stretching to change the radius of the rounded corners.)
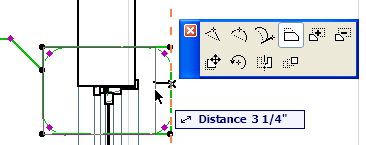
The Marker Line is optional, and the position can be adjusted numerically in the Marker Geometry parameters but far more easily onscreen using standard editing methods on the diamond-shaped editable hotspots. TIP: Use the Stretch option from the far right of the pet palette.
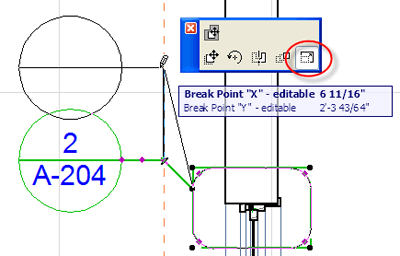
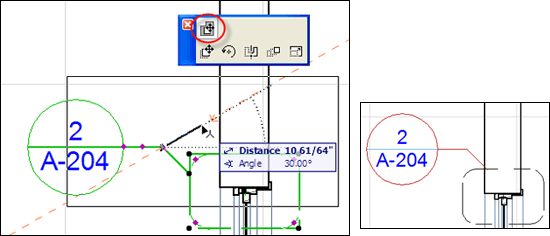
The marker line “attachment point” can be adjusted by “grabbing” one of the editable hotspots (diamond-shaped) and selecting the Move Sub-element option in the pet palette (top row left side, highlighted in screenshot below). Note that the moving preview ghost image may look like you are moving the Detail Marker as a whole (notice the large rectangle in screenshot), but you will only be moving the callout head and marker lines.
The name of the detail can be set before you place the marker in the Info Box.
However, if you did not set it properly before placing the marker, you will find when selecting the marker that you can no longer edit its name and ID in the Info Box or Detail Marker Settings dialog (it is grayed out).
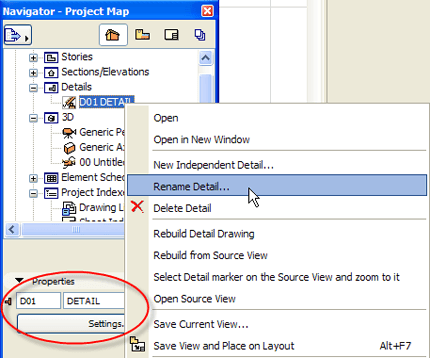
This is because the Detail Marker is linked to a Detail Drawing which was named based on the original settings. To change the ID and/or Name, you must edit the Detail Properties in the Project Map (right-click on the Detail and choose Rename Detail…).
You can also click on the Detail in the list, then edit the ID or Name in the Properties area at the bottom of the View Map, or click the Settings… button.
The second article of this series, to be published in next month’s Tips and Tricks section, will describe how to use ArchiCAD’s built-in Detailer objects and Template to speed up creating your detail drawings. These tools also help you to easily maintain a consistent graphic arrangement on a Detail sheet using a Grid.


