ArchiCAD Tutorial | Favorites and Visual Legends
bу Eric Bobrow, December 28, 2006
originally published in AECbytes – Tips and Tricks Issue #13
One of ArchiCAD’s “hidden gems” is the Favorites Palette, a very powerful resource that improves both efficiency and consistency. It allows frequently-used standard settings for any tool or element type to be recalled at a moment’s notice, speeding up both modeling and documentation.
Another more graphic variation of this approach is the use of “Visual Legends,” in which commonly used elements are laid out onscreen so that their parameters can be picked up on the fly. Favorites and Visual Legends can be incorporated in office standard templates, or imported on-the-fly from separate files in a variety of ways.
Working with Favorites
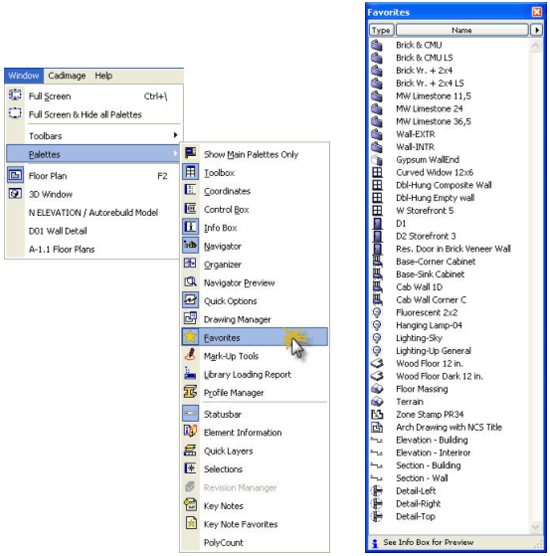
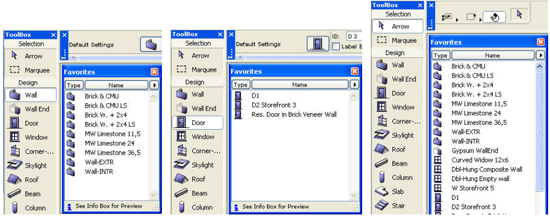
The Favorites Palette can be invoked (made visible) using the Window menu > Palettes submenu.
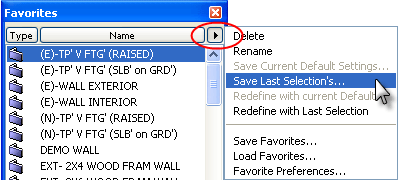
To create a Favorite, select any element onscreen (e.g. a wall, window, or object, etc.) and choose Save Last Selection’s… from the Favorite Options popup menu at the top of the Favorites Palette (where you see the small triangle icon). You will have the opportunity to name the Favorite, and it will then be added to the list shown in the palette. (NOTE: a Favorite can be renamed later by highlighting it in the list and choosing the Rename command.)
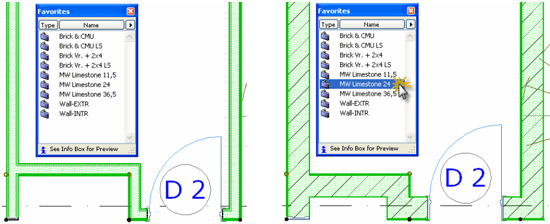
To choose and activate a Favorite, simply double-click the entry in the palette. If no elements in the project are selected at the time (or none that match that tool type), then the appropriate tool is activated and the default settings are changed to match the Favorite (much like how the Eye-Dropper tool picks up settings from an onscreen element). At that point, one can draw new elements (such as walls or slabs, insert windows or doors, or place objects, draw lines, etc.) with settings exactly matching the preset Favorite.
If, on the other hand, one or more elements are selected that match the tool type of that Favorite, then double-clicking will transform those elements, “forcing” them to conform to the settings of the Favorite, exactly like the Syringe tool (although more powerful since it can affect many elements at once).
Variations of the Favorite can be made by altering the parameters, such as the dimensions of a window or height of a wall, either before or after placing it.
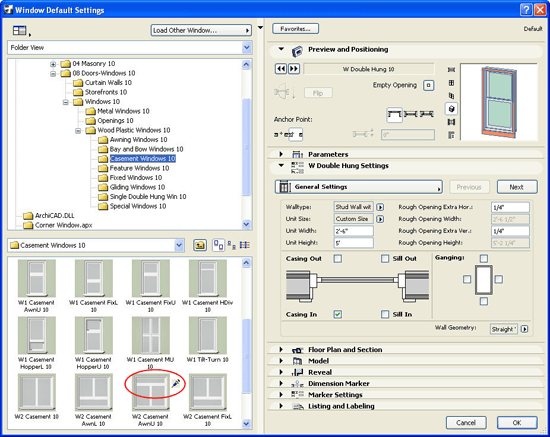
TIP: Using ArchiCAD’s Parameter Transfer option within a library part dialog box, it is possible to change from one type of element to another (e.g., from a casement window to an awning type, or from a single door kitchen cabinet to a double door version) and keep the “family resemblance” or style of the Favorite. Simply hold down the Syringe keys (PC: Control-ALT; Mac: CMD-Option) when clicking to select the new library element; see the graphic below to see the Syringe used inside the Settings dialog box. All possible parameter settings will be transferred to the new component (rather than getting the standard or default settings for that part). The new component will have the same materials, 3D and 2D options, and general “style” as the earlier one. This technique applies both to default settings (next element to be drawn) and selected element settings (affecting one or more elements already placed in the project). With this method, one does not need to set up as many types of Favorites, since variations can be created easily as needed.
The standard setting for the Favorites Palette is to show only the Favorites for the currently active tool, except when the Arrow tool is active, in which case all Favorites are displayed. (NOTE: If you prefer to see all Favorites regardless of which tool is active, you can change this option with the Options menu > Work Environment > Dialogue Boxes & Palettes command.)
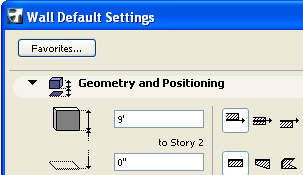
Favorites can also be accessed from within each tool’s settings dialog using the Favorites button at the top.
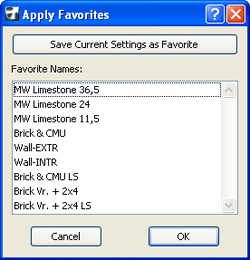
There, in the Apply Favorites window, only Favorites for the current element type will be displayed. Add a new Favorite to by clicking the Save Current Settings as Favorite button.
Settings can be picked up by clicking the Apply Favorites window OK button, which will modify the default settings (next elements to be drawn) or change selected elements (if some were pre-selected).
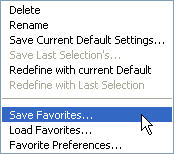
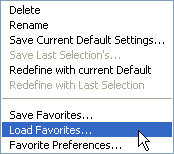
The entire current set of Favorites can be exported for later use by selecting the Save Favorites command from the Favorites Options palette popup menu (at the top of the main Favorites Palette).
Saved Favorites files have the extension .PRF (like preferences) and can be loaded into other projects (or even other workstations in the office) using the Load Favorites command.
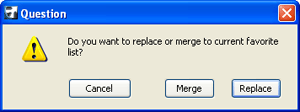
When loading Favorites, one has the choice of replacing the Favorites (only the imported Favorites will then be in the palette) or merging the Favorites (the list gets longer).
It is easy to change the Favorites settings for particular phases of project work, such as when laying out a kitchen, or when drawing sections or detail drawings.
A great way to set up Favorites for an office is to take an existing project that is finished, or at least well-developed, and select elements that will be useful for future work and add them one by one to the Favorites Palette using the Save Last Selection’s… command. In just a few minutes, one can create an entire set of Favorites by picking up frequently-used wall types, doors, windows, objects, text, dimensions, slabs, roofs, etc. Then Save Favorites to create a .PRF file that can be imported into any other project.
Favorites “live” with the project, and will be available whenever the project is opened. In addition, when creating a new project with the Use Current Settings option, the Favorites will be included. Favorites used in a project will be retained when creating a Template file from that project. (NOTE: A simple way to create a Template is to delete all of the actual building model, perhaps leaving some of the Elevation and Section markers, then using the Save As… a TPL file command from the File menu.)
Using Visual Legends
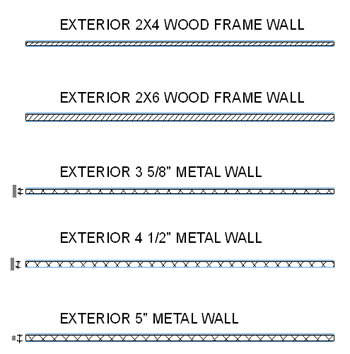
A great variation of the Favorites Palette is creating a Visual Legend of typical wall types, doors and windows, objects, etc.
Legends like this one can be placed to the side of the actual project, so it’s easy to use the Eye-Dropper to pick up the settings from the elements, then draw immediately.
Visual legends can include explanatory text notes to clarify each element to aid quick selection, and can even have elevation or 3D views pasted in alongside. Illustrated here is part of an elaborate project template legend created by Los Angeles designer Tamir Barelia for the XLArt Design Group.
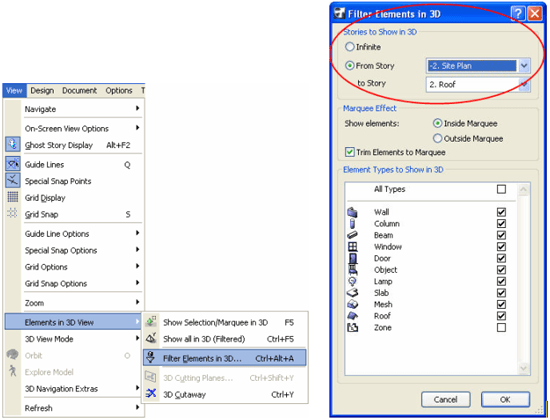
The advantage of a visual legend is that it is very graphic, and lots of information can be laid out in coherent groupings to simplify and speed up selection. However, one has to then be careful to exclude the legend elements from 3D views or Sections and Elevations, because they will tend to “show up” just like the real model, off to the side of the building. One approach is to draw a Marquee selection box around the actual building, and use the command Show Selection/Marquee in 3D (available from the right-click popup menu, or by typing F5 for PC or F4 for Mac). Similarly, by carefully drawing or adjusting the Section or Elevation markers with appropriately limited side extents as well as limited depth, the Sections and Elevations will not include the legend elements.
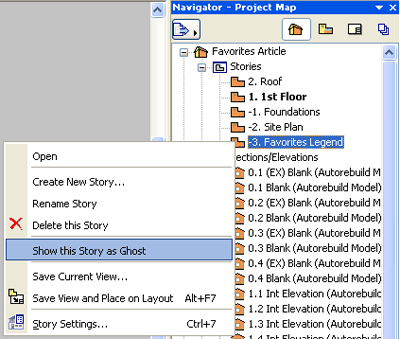
Another approach is to place the visual legend onto another Story in the model, perhaps a “dummy” negative story below the site or topo. Then it is possible to Ghost that Story and see the elements in order to use the Eye-Dropper.
One can restrict the 3D views (using the View menu > Elements in 3D View > Filter Elements in 3D) to show only the “real” active stories.
I learned this technique from Russ Sanders of Orcutt Winslow Partnership, who described the experience of picking up the settings from the Ghosted elements as “ice-fishing,” since Ghosted elements usually look grey or pale in color, similar to being under the ice.
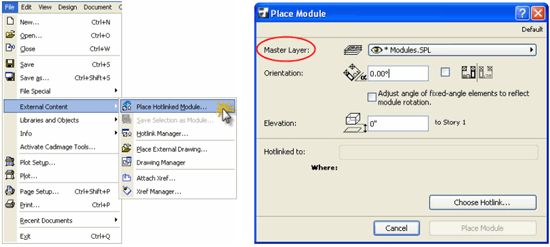
An interesting variation was developed by Tamir Barelia based on ideas presented by Santa Monica architect Van Hohman, with help from Bobrow Consulting Group trainer, Scott Bulmer. Tamir maintains the visual legend as a Module file. The MOD file can be merged into any project instantly, and can be kept on a file server to be easily updated for an entire office. He places the MOD file as a Hotlinked Module (using the File menu > External Content > Place Hotlinked Module command), so that the visibility of the entire legend can be controlled by the Master Layer of the Hotlink. This means that Layer Combinations and Views can be created with the Master Layer hidden, a very simple way to make the legend elements disappear when viewing the model in 3D or working on Sections or Elevations.
Favorites and Visual Legends are both excellent methods to “turbocharge” your workflow, whether you are on your own or are part of a larger office. They also guarantee a certain consistency within and between projects, so they effectively embed and embody office standards.
Users will save time choosing standard element settings when frequently used options are set up in the Favorites Palette or in a Legend. It is so much faster, and also ensures that, for example, all instances of Wall Type A are drawn on the right layer, with consistent materials, thickness, pen settings, and other attributes. Favorites and Visual Legends easily extend to 2D annotation as well, so that dimensions, room tags, callouts and other symbols and text match the office standards wherever they are placed.
END NOTE: I have created an ArchiCAD tutorial video on Favorites that you may watch on my YouTube channel. You may also find this ArchiCAD video here on this website.

