ArchiCAD Tutorial | Creative Uses of ArchiCAD’s Complex Profiles
bу Eric Bobrow, August 1, 2008
Originally published in AECbytes Tips and Tricks Issue #32
ArchiCAD introduced in version 10 two years ago a technology for creating complex profiles for use in the wall, column and beam tools. The Profile Manager allows the user to draw the equivalent of a section cut through the element, and will extrude that combination of shapes along the path of the wall, column or beam.
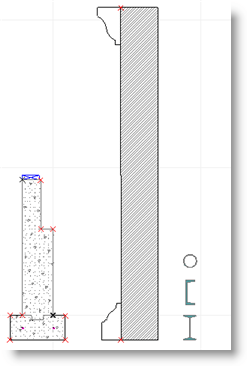
There are some obvious uses for these profiles, such as a structural steel shape for a column or beam, or a wall that changes composition (e.g., stone at the base, stucco above). Pictured below are some examples of basic profiles available in the standard U.S. ArchiCAD Template (the international set is similar). There is a foundation stem wall and footing, a wall with a base and crown molding, and a variety of structural steel shapes for beams and columns.
Basic techniques for making and using complex profiles are described in the ArchiCAD Help system and in the printed manual. A nice introduction to the concept appears in the AECbytes article by Jim Mahoney. An excellent article in Cadalyst by Greg Kmethy shows how to create composite walls with varying skin heights using complex profiles.
This article will focus on some creative and occasionally surprising applications of the complex profile technology. A number of colleagues and clients have offered ideas which opened my eyes to these possibilities over the past two years.
Review of the Basics and a Few Tips
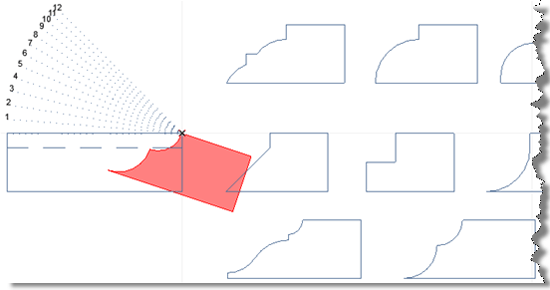
One can create and manage complex profiles by selecting from the Design menu > Complex Profiles > Profile Manager. The Profile Manager palette is pictured on the left-hand side of the image below. Choosing a listed profile from the popup menu, then the Edit Chosen Profile… button, will open up the Profile Editor, a drafting view of the profile. One can also click the New button to open up a blank drafting window and start fresh.
Profiles are basically made up of Fills that are turned into solid volumes when extruded. The Fill defines what a section cut will show, so it is frequently chosen based on the actual construction material. Each Fill has an associated surface Material, which determines the appearance of the finish (outside surface treatment). It is possible to use the editing palette to select any edge and modify it to have a special color or material, different from the general edge treatment.
The origin point (signified by the small “x” onscreen in the editing window, seen in the center of the image above) is used to determine where the shapes will be placed (horizontally and vertically) when drawing the profiled wall, column or beam. Vertical and horizontal stretch lines (not pictured, as the “eyeball” is turned off for these options) allow certain parts of the profile to be “fixed” while others will stretch. This allows a wall to have variable heights, while keeping the stone base (or crown molding, etc.) in its original shape and size.
The Use with: buttons specify whether the profile should be added to the wall, column or beam lists. Selecting these checkboxes carefully will minimize the length of the popup list for each tool—for example, the column tool will not list profiles that are only appropriate for walls. A profile is saved by clicking the Store Profile button, at which point it may be named.
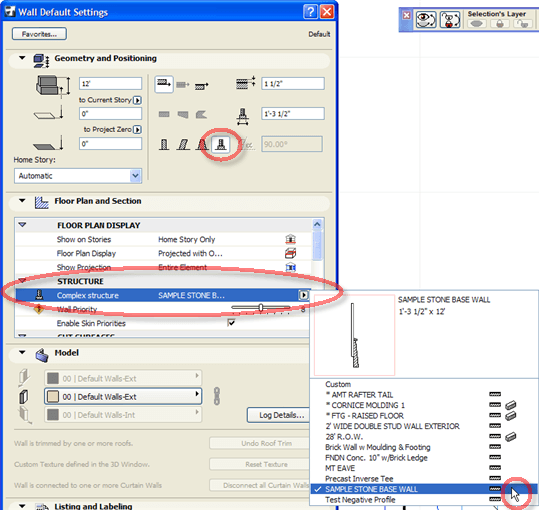
To use a profile, in the Info box or Settings dialog for the wall, beam or column, choose the profile option (as opposed to a simple straight or tilted shape), then choose a profile from the popup list. Draw or place the profiled element exactly like a simple one.
In most ways, these profiled elements behave like their basic counterparts, cleaning up at intersections, and allowing holes (in beams) and doors and windows (in walls).
One can copy linework from a section or elevation and paste it into the Profile Manager, in order to create a shape that will fit into the design context. Alternatively, one may use the Capture Profile of Selected Element from the right-click context menu, to bring in the shape of a current component and then modify it as needed into a more complex configuration. It’s even possible to Combine Walls into a Complex Profile, by selecting two or more stacked or adjacent walls in a section or 3D, thus simplifying creation of the basic profile shape.
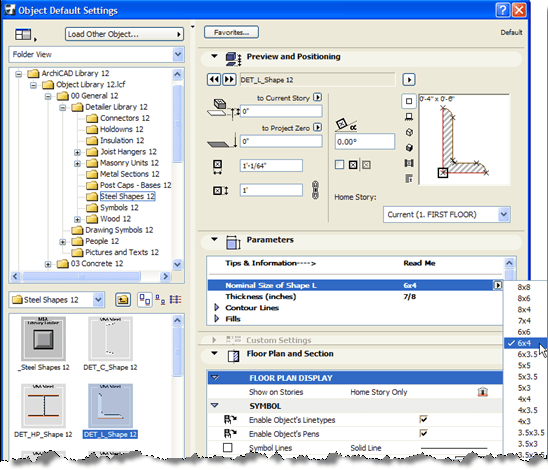
A structural steel shape can be created based on standard steel tables, at least in the U.S. version of ArchiCAD. Simply place one of the 2D steel shapes from the Detailer section of the ArchiCAD Library, using the popups to select standard sizes from the steel manufacturers’ tables.
Use the Edit menu > Reshape > Explode into Current View (choose the option to keep exploded elements only). Next, use the Fill tool and trace the outline to create a Fill of that same shape, either manually or automatically using the Magic Wand (hold down the Space bar on your keyboard, and click the edge or corner of the exploded steel shape).
If a profile is redefined in the Profile Manager, all associated elements will update automatically. One can also select one or more walls (or beams or columns) and reassign them to a different profile in the Info box or the Wall Settings dialog. Design changes can be made and evaluated quickly.
The definitions of profiles are stored in the project, and can be transferred from one project to another by using the Options menu > Element Attributes > Attribute Manager. It is also possible to copy an element or elements from one project and paste into another one, and if the profile doesn’t exist in the receiving file, it is automatically added to the profile list.
A great way to keep frequently used profiles is to store them in your office template (TPL) file, so that all new projects have access to those profiles. For example, in the ArchiCAD MasterTemplate we have set up a large number of common profiles (including all the ones in this article) to make it easy to select and adapt as desired. For more information on the concept of templates and office standards, please refer to my recent ArchiCAD article.
Moldings and Edges
An obvious application for profiles is the creation of moldings and edge treatments. Simply define the shape for a crown or baseboard molding, and store it enabled for use with the Beam tool. Then draw the beam along the edge of the walls in a room, at the proper height, and one instantly has a molding for 3D views and sections.
If one combines one or more moldings into the profile for a wall itself (as in one example from the very first illustration of this article), then when drawing the wall, the moldings are placed automatically. Using the vertical stretch zone in the Profile Manager allows variable wall heights or thicknesses to be used without affecting the shape or size of the molding itself.
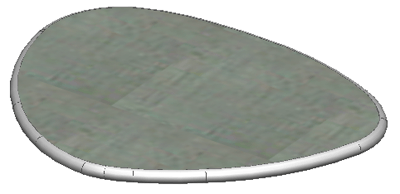
A bullnose or other edge treatment can be added to a counter or table with the use of a profile. Even a complex table outline can be edged using the magic wand in a single step. Here is an example of a freeform shape, originally created with the Spline tool, that has been autotraced with the magic wand to create a slab for the table top.
An edge profile has been applied using the magic wand and the Wall tool. (Note: wall profiles can curve, whereas beam profiles are limited to straight runs; beams can rise on an angle, while walls cannot.)
TIP: The ArchiCAD Library has some molding objects that offer a variety of crown, baseboard and chair rail profiles. One cannot add a new profile to the object list, but there is enough variety to approximate a good range of options.
Profiles for Quick Concepts and Massing
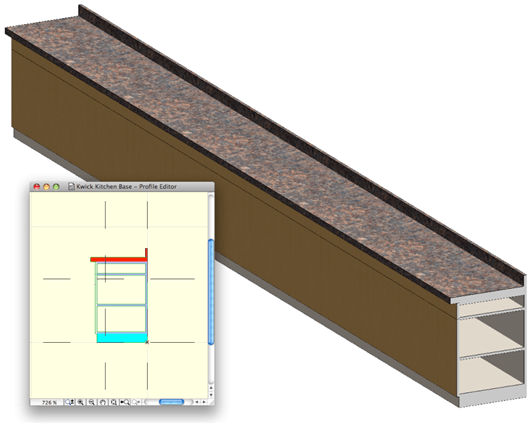
Scott Bulmer (a Newbury Park, CA architect who works for our company as a trainer and consultant) suggests two innovative uses of the Profile tool for concept studies. A profile can be created for a cabinet body and used to quickly delineate a kitchen layout. The shape below is set for use with the Beam tool, since there will be no need to add actual doors or windows.
Drawing a beam profile from wall to wall, or to create an “L” or “U” shape is extremely simple and shows nicely on plan and in a 3D view. An additional profile can be made to cover the ends of the cabinet body. No effort is needed to specify the number of actual cabinets or the actual door or drawer configuration. A change in the profile allows instant evaluation of different finishes or options such as backsplash height.
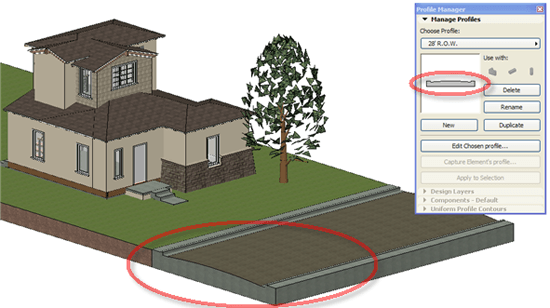
Another application for both section drawings and 3D renderings is to create a road bed profile, including sidewalks and curbs. The horizontal stretch zone can allow the road to be wider or narrower using variations of the same profile, without disturbing the shape of the curb and sidewalk.
This profile should be set up for both walls and beams. When placed with the Beam tool, a tilt angle can be set to make the road change elevation; with the Wall tool, a roadbed can curve smoothly with any desired radius. To create a curved road that also changes elevation, one may use a series of angled beams that approximate the curve.
Rafter Tails
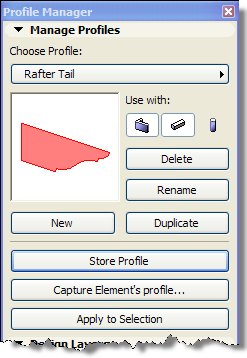
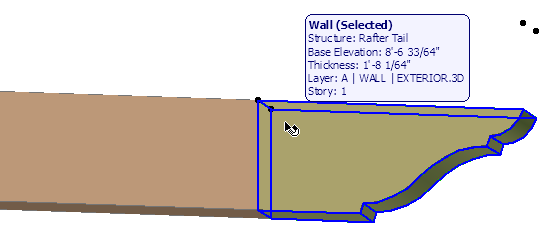
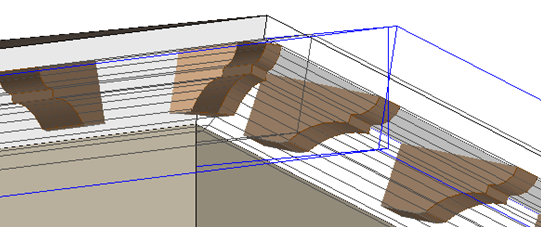
Creating a rafter tail with a complex shape is simple with the profile technology. Simply draw the shape and give it a name.
The only confusing part of this is that the profile is drawn as a short extrusion on the floor plan (with the Roof Plan layer combination) in the direction perpendicular to the actual rafter. For example, if the rafter is made of a 2 x 10 piece of lumber (nominally 1 ½” thick) then the profile is drawn to be 1 ½” long, going along the edge of the wall.
The profile is drawn to show the exposed part of the rafter, while the main body of the rafter is made using a simple tilted beam. These two elements need to be carefully aligned by the user to make them simulate one continuous structural component. The profile for the rafter tail will have a fixed angle, and will need to be adjusted and re-saved if the roof angle (and of course the beam tilt angle) differs.
Another approach suggested by Abraxis “Abe” Spera (an ArchiCAD user in Sacramento CA) is to use the profile as a cutting tool using Solid Element Operations. In this method, the profile defines the negative space and is extruded parallel to and along the full length of the wall. The rafters themselves are each simple tilted beams that extend the natural distance from the ridgeline down to the end of the tail. All the rafters (beams) along one edge can be selected as the Target, and a single long profile extrusion is set as the Operator, which is Subtracted from the beams. The profile is placed on a layer that is hidden for normal 3D, elevation and section views; in the image below, that layer is set to Wireframe in the Layer Settings dialog.
TIP: For an introduction to Solid Element Operations (SEO) please see my article in AECbytes from September 2006.
The advantage of this approach is that the rafter beams are each a single element with a “natural” physical length. In addition, if the length of the tail is modified, the beams can be stretched longer or shorter, and the profile can simply be moved to align properly for the cut.
Abe created another innovation in his implementation that is worth sharing as a tip. He has drawn a number of different common shapes in the rafter tail profile using the Line or Polyline tools. Only one shape is set up as a Fill, so that is the “active” shape of the profile. However, by simply using the Magic Wand to autotrace a different polyline shape, one can create a Fill with that form, and delete the earlier Fill. Then when the profile is stored (re-saved), all rafter tails will immediately take on the new sculptural shape! It’s a dramatic and very useful application of redefining a profile to study different options.
Of course, whether creating a positive shape or a negative space cutting tool, the profile can and should be adjusted to match the angle of the roof as needed. Abe has set up standard roof pitch angles as drafting guidelines within the profile definition to make this as easy as possible. His approach to rafter tails is so optimized that (with his permission) we have added it to the ArchiCAD MasterTemplate as a resource for use and adaptation.
Complex Geometries
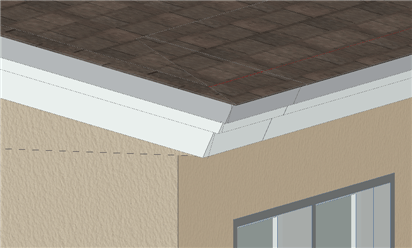
A common situation that is actually quite complex geometrically (ask any carpenter) is for moldings to be applied to both the eave and rake of a roof. A simple use of beam profiles will not give a clean result, although for section drawings, and for views from a distance, it may be perfectly acceptable.
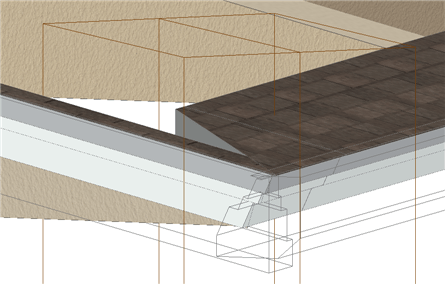
An excellent solution is a variation of the approach outlined above for using Solid Element Operations to subtract the negative space to create a rafter tail. Simply create a profile defining the negative space for the moldings, and extrude along both the roof eave and rake, then subtract using SEO from simple rectangular fascia beams to create the molding shapes.
The actual corner will still have an overlap between the two rectangular beams, which is subtle but may be objectionable to some users who want a totally clean result. To remove this overlap, create two more simple shapes running at a diagonal to the intersection, and use an SEO subtraction for each one to the opposing fascia beam.
Add-Ons for Profiles
Graphisoft provides an add-on called Profiler that is found in the Design menu > Design Extras. (Note: before ArchiCAD 12, Profiler was not loaded automatically, but was available as a free download from the ArchiCAD Help menu > Goodies). This Profiler add-on is totally independent and separate from the Profile Manager’s complex profiles as described throughout this article.
There are two special features of the Profiler that distinguish it from complex profiles, but a few limitations to note. Profiler can create an extrusion for an entire polyline path, in a single step; this extrusion is saved as a custom object (GSM) file that will need to be added to the project library. This can be very convenient, and with careful planning of what layers and elements are seen onscreen, can take advantage of the Magic Wand to autotrace a complex path. However, if the path changes, or you want to change the profile shape, you have to start from scratch—one cannot edit the path or swap in a different profile.
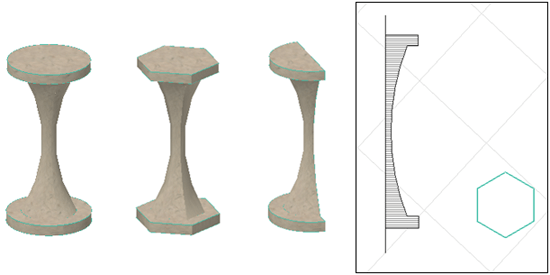
Using a different option, the Profiler add-on can create lathed forms, such as balusters, columns, vases or tables. The lathed forms can be swept around a partial circle, for example to create a half-round 180 degree shape to fit a column against a wall, or 270 degrees to fit around a corner. By setting different settings for resolution in the GDL script, these can be nicely rounded (with the default resolution of 36 facets approximating a circle) or polygonalized (by changing the resolution to 6, 8 or 12, for example).
An excellent add-on from Cadimage is called 3D Profiler. This tool is similar to, but has several improvements on the profile technology built into ArchiCAD. It can manage an extrusion path as an editable polyline (rather than a series of segments). The path nodes can have different heights and even filleted corners, making it easy to create a hand-rail that goes up the stairs, or a molding following the eave and rake of a roofline. The path can be edited at any time, in any view, even in 3D or elevation.
Conclusion
ArchiCAD’s Complex Profile technology allows a wide variety of extruded and swept forms to be modeled easily. It can be a great tool for quick massing and concept studies, or applied to fine details. Since any shape can be instantly turned into a profile, it is extensible by the user as needed, while at the same time allowing a library of profiles to be developed for a project or within an office standard template.
To give me feedback or ask questions about this article, please send an email to article@bobrow.com. I look forward to hearing from you!

